
Last month Tanzu Division of Broadcom announced GA of Tanzu Platform 10. In this blog, I will walk through following
- Architecture Diagram
- Installation requirements for Tanzu Platform 10
- Deploy TKGs Cluster
- Deploy required components & packages.
- Prepare TKGs Cluster for Tanzu Platform 10 installation
- Prepare Bootstap Machine required for installing Tanzu Platform 10
- Download Install Bundle
- Deploy Tanzu Platform 10
What is VMware Tanzu Platform 10
VMware Tanzu Platform 10 a.ka. Tanzu Platform Self-Managed for Kubernetes (TPK8s SM) is the Kubernetes runtime for the Tanzu Platform, exposed by the Tanzu Platform UI and the Tanzu CLI. It helps platform engineers to build conformant and replicable Kubernetes environments, and DevOps engineers to push applications into production, both in the Tanzu Platform UI and with the Tanzu CLI.
Architecture Diagram

Planning your TPK8s SM deployment
The first step is to plan your deployment depending on your requirements. You will need to select the Installation flavor & profile
Installation Flavor
The installation flavor defines which services and capabilities are available during deployment. This allows you to tailor the installation to your needs. For this release, the following flavors are available:
| Flavor | Description |
| Essentials | This flavor installs Tanzu Platform, including features to support VMware Cloud Foundation inventory, Tanzu Platform for Cloud Foundry multi-foundation view, Tanzu Spring, and Tanzu Salt. |
| Full | This flavor installs the Tanzu Platform with the essential features and enables features to support Kubernetes operations, Spaces, and build services. This is the default mode for installation. |
Installation Profile
Your installation profile defines the resources required to deploy Tanzu Platform Self-Managed, which is correlated to how many resources you will be managing. It is possible to change your profile later if you need to expand your deployment. Select a profile that meets your current requirements and change profiles later as your requirements change.
|
Profile |
Description |
|
Evaluation |
The evaluation profile has a minimal resource footprint, and can be used for demonstration and evaluation. It is not supported for production use. This profile allows you to create 2 projects with up to 10 application instances, and manage up to 20 Kubernetes clusters. |
| Foundation |
The foundation profile is a minimal production deployment, and intended for small environments or for customers who wish to gradually adopt Tanzu Platform and expand as needed. This profile allows you to create 4 projects with thousands of application instances, and manage up to 100 clusters. |
| Regular |
The regular profile corresponds to most customer environments. Most deployments use this profile because it provides a good balance between supported resources and hardware requirements. This profile allows you to create 6 projects with thousands of application instances, and manage up to 500 clusters. |
| Enterprise | The enterprise profile is suitable for customers who require support for thousands of applications and resources. Select this profile initially only if you expect to support more resources than the regular profile. This profile allows you to create 6 projects with thousands of application instances, and manage up to 1000 clusters. |
Resource Requirements
The resource requirements may vary depending on what Installation Profile you select as mentioned in the below table
|
Profile |
Resource Requirements |
|
Evaluation |
Control plane Workers |
| Foundation |
Control plane |
| Regular |
Control plane |
| Enterprise |
Control plane |
Pre-Requisites
vSphere IaaS control plane (formerly known as vSphere with Tanzu)
|
Supported TKR versions |
My Lab Environment |
|
TKr 1.27.11 for vSphere 8.x TKr 1.28.8 for vSphere 8.x TKr v1.29.4 for vSphere 8.x |
TKr v1.29.4 for vSphere 8.x |
For more details on the components included you can refer official doc for Tanzu Kubernetes releases
Ingress FQDN
FQDN for TPK8s SM Ingress which is resolvable from the Bootstrap machine that will be used to perform installation.
Linux Bootstrap Machine
You will need a Linux VM with the following
- 100 GB of minimum Storage.
- Access to the Internet to download the installer from the Broadcom Support Portal
- Access to Private Container Registry (Harbor in my lab)
- Access to the Kubernetes Cluster where TPK8 SM will be installed
Note – In my lab, I have a VM with 4 vCPU, 8 GB RAM with 150 GB HDD
Port Requirements
|
Source |
Destination | Port / Service | Purpose |
| Bootstrap Machine | Broadcom Support Portal |
443 (HTTPs) |
To download the TPK8s bundle |
| Bootstrap Machine | TKGs K8s Control Plane Cluster | 6443 (HTTPs) | To install TPK8s SM control plane |
| Bootstrap Machine | ghcr.io/aquasecurity/trivy-db | 443 (HTTPs) | To download the trivy db for vulnerability scanning |
|
Bootstrap Machine |
TPK8s SM FQDN |
443 (HTTPs) | To access console UI to access Tanzu Platform SM |
| Bootstrap Machine | Private Container Registry | 443 (HTTPs) | To pull images, tmc extensions, trivy database , tanzu cli plugins |
| TKGs K8s Control Plane Cluster Nodes | LDAPs Server | 636 (TCP) | LDAP authentication to Ldap Server (If Applicable) |
|
TKGs K8s Control Plane Cluster Nodes |
Okta | 443 (HTTPs) | OIDC authentication to Okta endpoint (If Applicable) |
| TKGs K8s Control Plane Cluster Nodes | Private Container Registry | 443 (HTTPs) | To pull images, tmc extensions, trivy database |
Private Container Registry
You will need to have an OCI-compatible private container registry such as Harbor. This will be required to host the following
- Base deployment Package Images
- Collector Images
- TMC extensions
- Tanzu CLI Plugins
- Trivy Database for Vulnerability Scanning
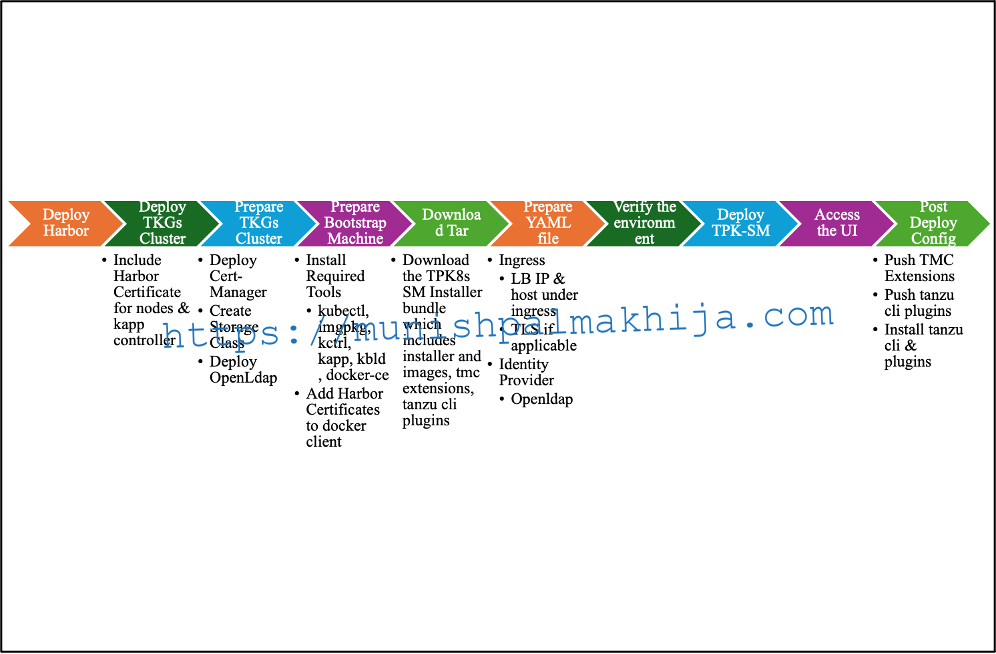
Installation Workflow
Following is the high-level installation workflow
Deploy Harbor
We will install a harbor image registry but this is optional if you already have one
Step 1 – Download Required YAML Files
Download the following YAML files for Contour and Harbor from https://vsphere-tmm.github.io/Supervisor-Services/
Contour files
- The Contour service definition file: contour.yml
- The Contour service configuration file: contour-data-values.yml
Harbor files
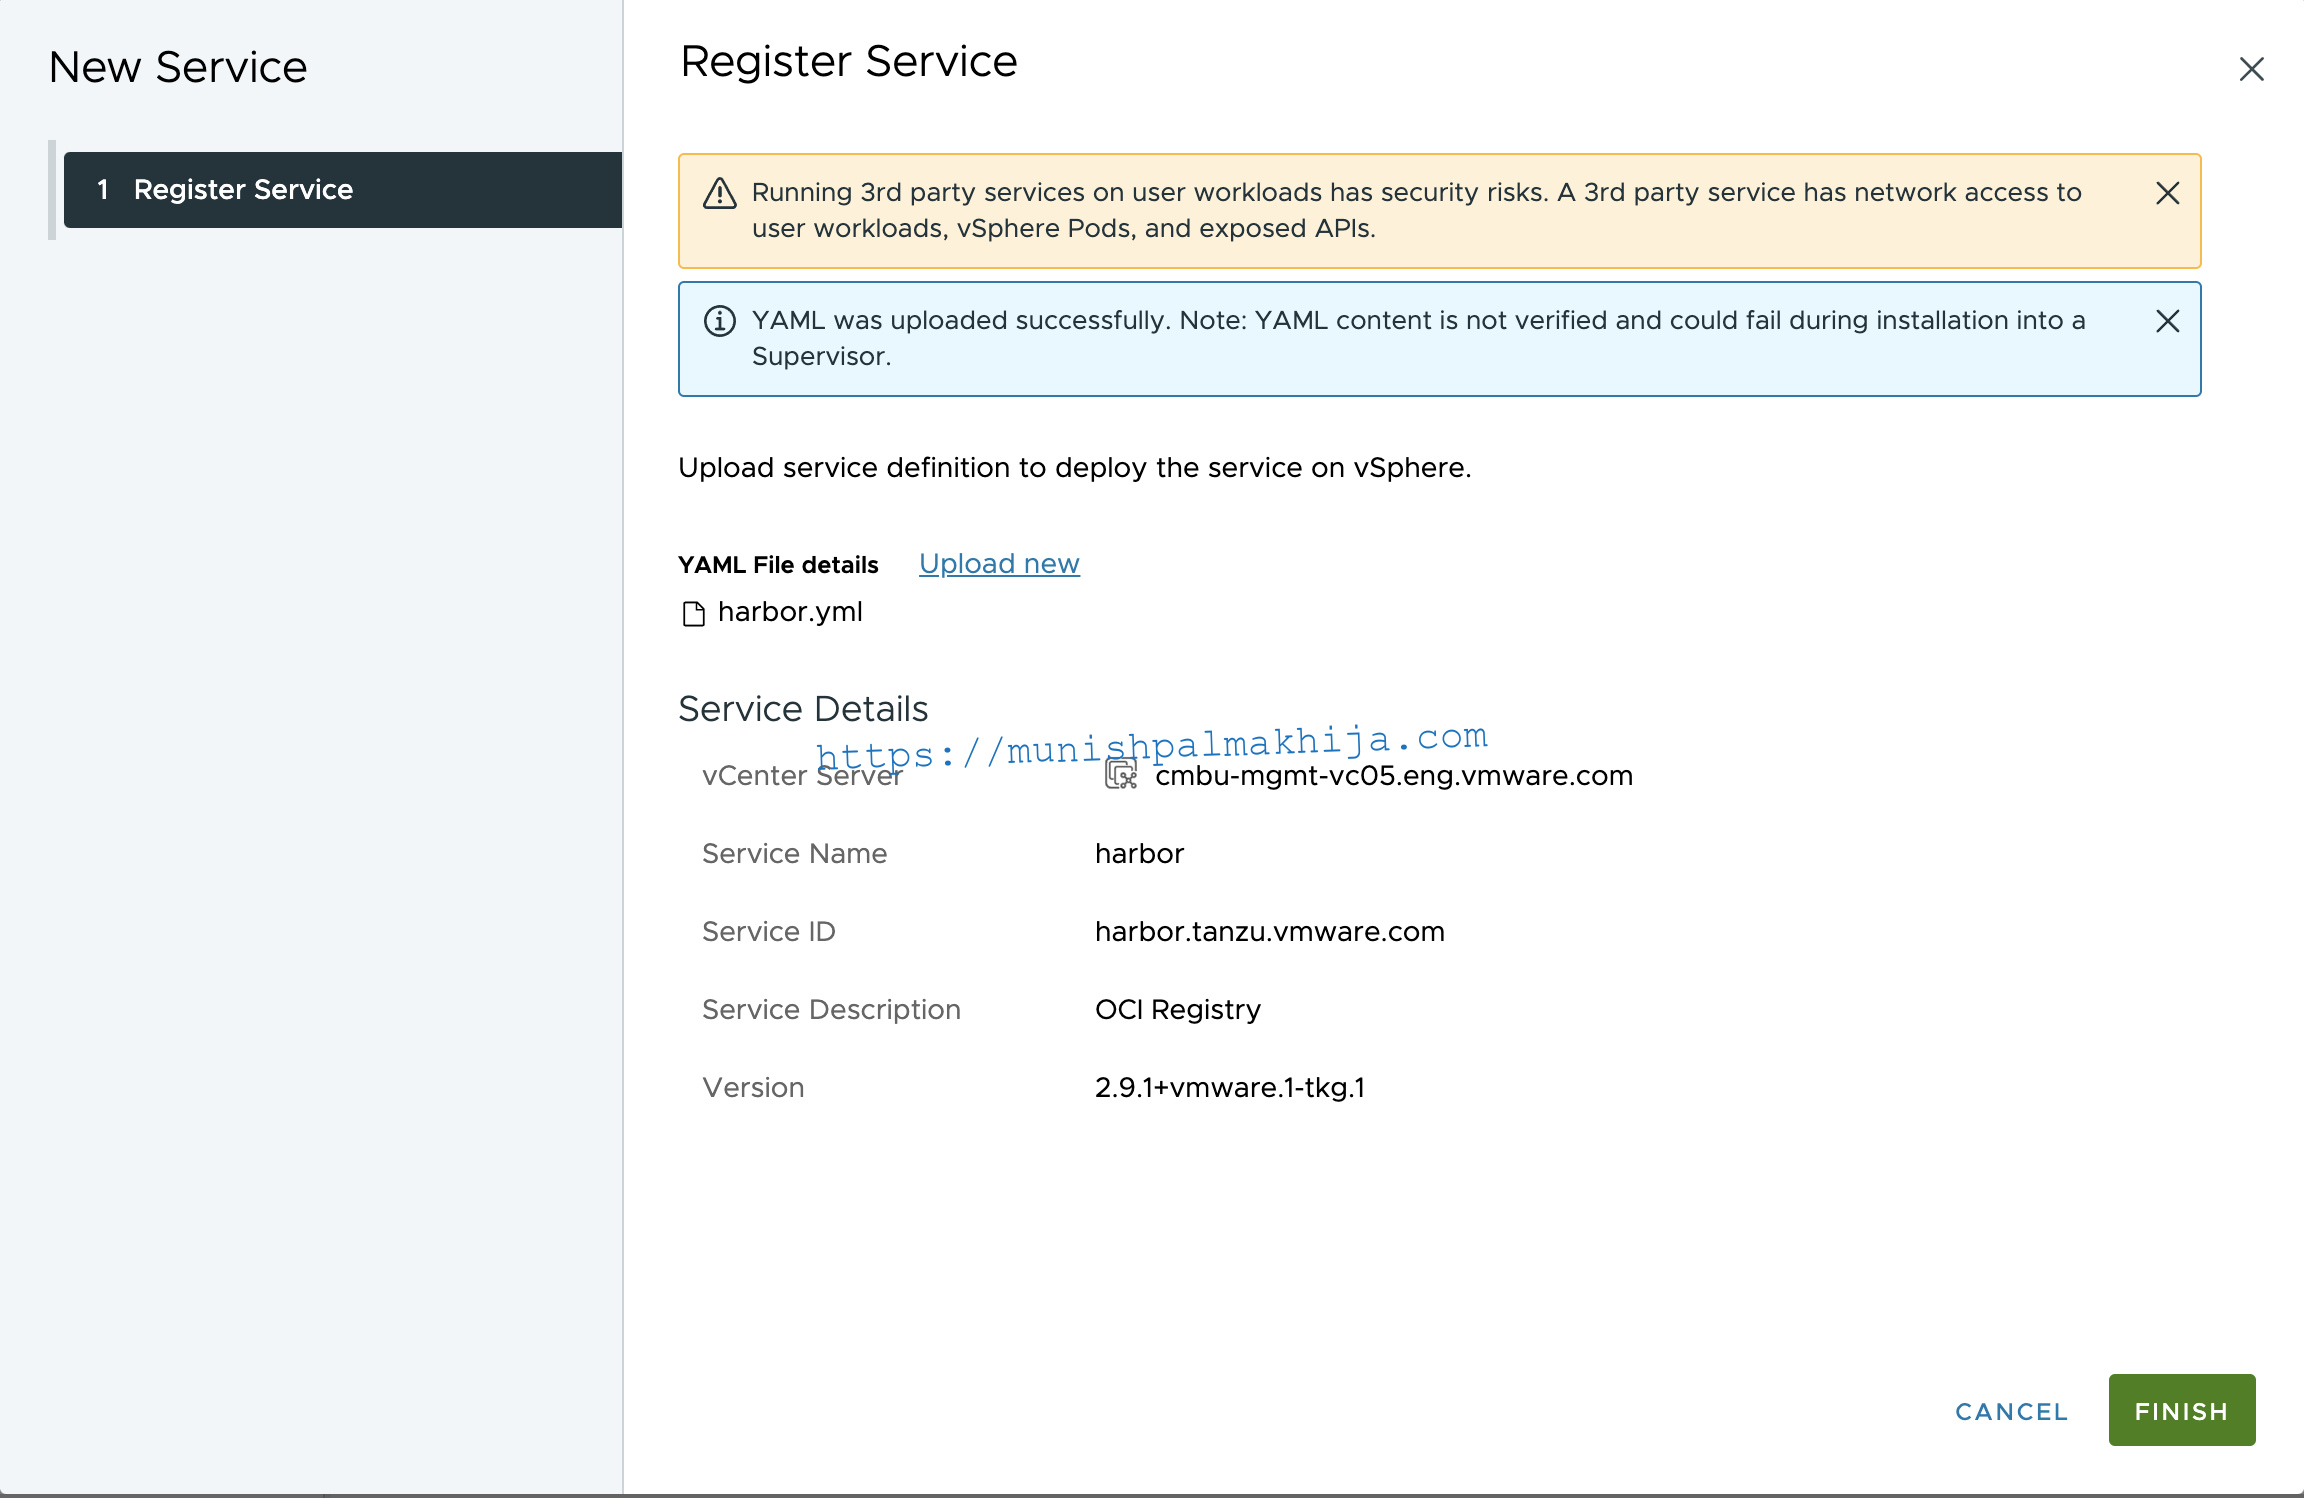
- The Harbor service definition file: harbor.yml
- The Harbor service configuration file: harbor-data-values.yml
Step 2 – Install Contour and Harbor Service in the Supervisor
Navigate to the Services Tab in Workload Management in vSphere

Add New Service for Contour and Harbor

Step 3 – Install Contour Service

Step 4 – Install Harbor Service

For more details please refer to this YouTube Video https://youtu.be/4LYi3U35tOk
Deploy TKGs Cluster with Harbor Integration
To integrate a private registry (harbor) with a TKGS cluster, you configure the cluster with one or more self-signed CA certificates to serve harbor content over HTTPS
In my lab, I have used v1alpha3 API
Procedure
Step 1 – Download the certificate
sudo wget -O . https://$HARBOR_REGISTRY/api/v2.0/systeminfo/getcert –no-check-certificate
Step 2 – base64-encode the contents of the certificate
cat ca.crt | base64
Step 3 – Create Namespace for the TKGs Cluster
Insert Create Namespace pic
Step 4 – Create Custom VM Class with 8 vCPU and 32 GB RAM
Insert Create VM Class pic
Step 5 – Save & Update following yaml
Step 6 – Apply to the TKGs Supervisor
kubectl apply -f <PATH_TO_YAML_IN_STEP5>
Step 7 – Extract Kubeconfig
kubectl -n ns01-tpk8sm get secret tkc01-tpk8sm-kubeconfig -o jsonpath='{.data.value}’ | base64 -d > ~/Downloads/tkc01-tpk8sm-kubeconfig.yaml
Step 8 – Verify access to the K8s clusters
export KUBECONFIG=~/Downloads/tkc01-tpk8sm-kubeconfig.yaml
kubectl cluster-info
For more details, you can refer to the official doc
https://docs.vmware.com/en/VMware-vSphere/8.0/vsphere-with-tanzu-tkg/GUID-EC2C9619-2898-4574-8EF4-EA66CFCD52B9.html
Prepare TKGs Cluster
Deploy Certificate Manager
Step 1 – Create Namespace
Create Namespace for certificate manager
kubectl apply -f- << EOF
apiVersion: v1
kind: Namespace
metadata:
name: cert-manager
labels:
pod-security.kubernetes.io/enforce: privileged
EOF
Step 2 – Download cert-manager extensions
imgpkg copy -b “extensions.stacks.whitesand.tmc.tanzu.broadcom.com/packages/standard/repo:v2024.8.2” –to-tar ~/Downloads/certificate-extensions.tar
Step 3 – Push cert-manager extensions to the private container registry (harbor)
Pre-req – Docker login to private harbor registry.
imgpkg copy –tar ~/Downloads/certificate-extensions.tar –to-repo $HARBOR_REGISTRY:443/hubsm/498533941640.dkr.ecr.us-west-2.amazonaws.com/packages/standard/repo –registry-ca-cert-path ~/Downloads/ca.crt –registry-username admin –registry-password <PWD>
Step 4 – Add package repository in cert-manager namespace
Add package repository in the cert-manager namespace.
kctrl package repository add –repository tanzu-standard –namespace cert-manager –url “$HARBOR_REGISTRY:443/hubsm/498533941640.dkr.ecr.us-west-2.amazonaws.com/packages/standard/repo:v2024.8.2”
Step 5 – Install cert-manager in the cert-manager namespace
kctrl package install -i cert-manager -p cert-manager.tanzu.vmware.com –version 1.10.2+vmware.1-tkg.1 -n cert-manager
Step 6 – Verify cert-manager installation
kubectl get pod -n cert-manager
Deploy Openldap with SSL
If you are using Okta or Microsoft AD for ldap then you can skip this step
Step 1 – Create Namespace
kubectl apply -f- << EOF
apiVersion: v1
kind: Namespace
metadata:
name: ldap
labels:
pod-security.kubernetes.io/enforce: privileged
EOF
Step 2 – Generate certificates for OpenLDAP
Generate certificates for OpenLDAP
openssl genrsa 2048 > ca-key.pem
openssl req -new -x509 -nodes -days 365000 -key ca-key.pem -out ca-cert.pem
openssl req -newkey rsa:2048 -nodes -days 365000 -keyout openldap-key.pem -out openldap-req.pem
openssl x509 -req -days 365000 -set_serial 01 -in openldap-req.pem -out openldap-cert.pem -CA ca-cert.pem -CAkey ca-key.pem
Step 3 – Create OpenLDAP certificate config map
Create a config map from the certs
kubectl create configmap openldap-crt –from-file=/path-to-open-ldap-certs/open-ldap-certs/openldap-cert.pem –from-file=/path-to-open-ldap-certs/openldap-key.pem –from-file=/path-to-open-ldap-certs/ca-cert.pem -n ldap
Step 4 – Create OpenLDAP app config map
Download the seed.ldif & Create config map from the app config.
kubectl create configmap app-config –from-file=seed.ldif -n ldap
Step 5 – Create OpenLDAP app config map
Download the ldap-k8s.yaml & deploy openldap
kubectl apply -f ldap-k8s.yaml -n ldap
Create Storage Class
Sample Procedure to create it for Postgres. You will need to do it for the following components
- Postgres
- OpenSearch
- Kafka
- zookeeper
- Redis
- Prometheus
- Prometheus-tmc (to be deprecated)
- Seaweedfs
- Clickhouse
For more details, you can refer to the documentation
sc_name = “postgresql-storage-class”
default_sc_name=”vsan-default-storage-policy”
kubectl apply -f- << EOF
apiVersion: storage.k8s.io/v1
kind: StorageClass
metadata:
labels:
isSyncedFromSupervisor: “false”
name: $sc_name
parameters:
svStorageClass: $default_sc_name
provisioner: csi.vsphere.vmware.com
reclaimPolicy: Retain
allowVolumeExpansion: true
volumeBindingMode: Immediate
EOF
Prepare Bootstrap Machine
Step 1 – Install Docker Engine on Jumpbox
sudo apt-get install docker-ce docker-ce-cli containerd.io docker-buildx-plugin docker-compose-plugin
Step 2 – Add Harbor Self Signed Certificate to Docker Client on Jumpbox
Add the certificate to docker config
export DOCKER_REGISTRY=xxx.com
# create a folder named like your registry
sudo mkdir -p /etc/docker/certs.d/$DOCKER_REGISTRY
# download the certificate
sudo wget -O /etc/docker/certs.d/$DOCKER_REGISTRY/ca.crt https://$DOCKER_REGISTRY/api/v2.0/systeminfo/getcert –no-check-certificate
# restart docker daemon
systemctl restart docker
# login
docker login $DOCKER_REGISTRY
Step 3 & 4 are only applicable if you created TKGs without harbor integration as mentioned above.
Step 3 – Add Harbor Self Signed Certificate to TKGs Cluster
Base64 encode the certificate
Update the same in the TKC cluster config under the settings
settings:
serviceDomain: cluster.local
trust:
additionalTrustedCAs:
– name: Harbor-Self-Signed-Certificate
Step 4 – Add Harbor Self-Signed Certificate to Kapp Controller
We need to add a harbor self-signed certificate to Kapp controller so it can pull in package repositories/package installs from Harbor.
Create Secret
First we need to create a secret for the Kapp Controller with a Harbor Registry Self-Signed Certificate
kubectl -n tkg-system create -f – <<EOF
—
apiVersion: v1
kind: Secret
metadata:
name: kapp-controller-config
namespace: tkg-system
stringData:
caCerts: |
—–BEGIN CERTIFICATE—–
MIIDKDCCAhCgAwIBAgIQJBt7sHm36rcMe4G8l3WytjANBgkqhkiG9w0BAQsFADAU
MRIwEAYDVQQDEwlIYXJib3IgQ0EwHhcNMjMwNDI2MDc0NTUyWhcNMzMwNDIzMDc0
[…]
httpProxy: “”
httpsProxy: “”
noProxy: “”
dangerousSkipTLSVerify: “”
EOF
Delete the kapp controller pod
kubectl -n tkg-system delete po kapp-controller-xxxx
Verify kapp controller pods is running
kubectl -n tkg-system get pods
Step 5 – Download and Push Trivy DB to Harbor Container Registry
oras pull ghcr.io/aquasecurity/trivy-db:2
oras push –export-manifest manifest.json $HARBOR_REGISTRY/aquasecurity/trivy-db:2 db.tar.gz
Download Installer Bundle
UI
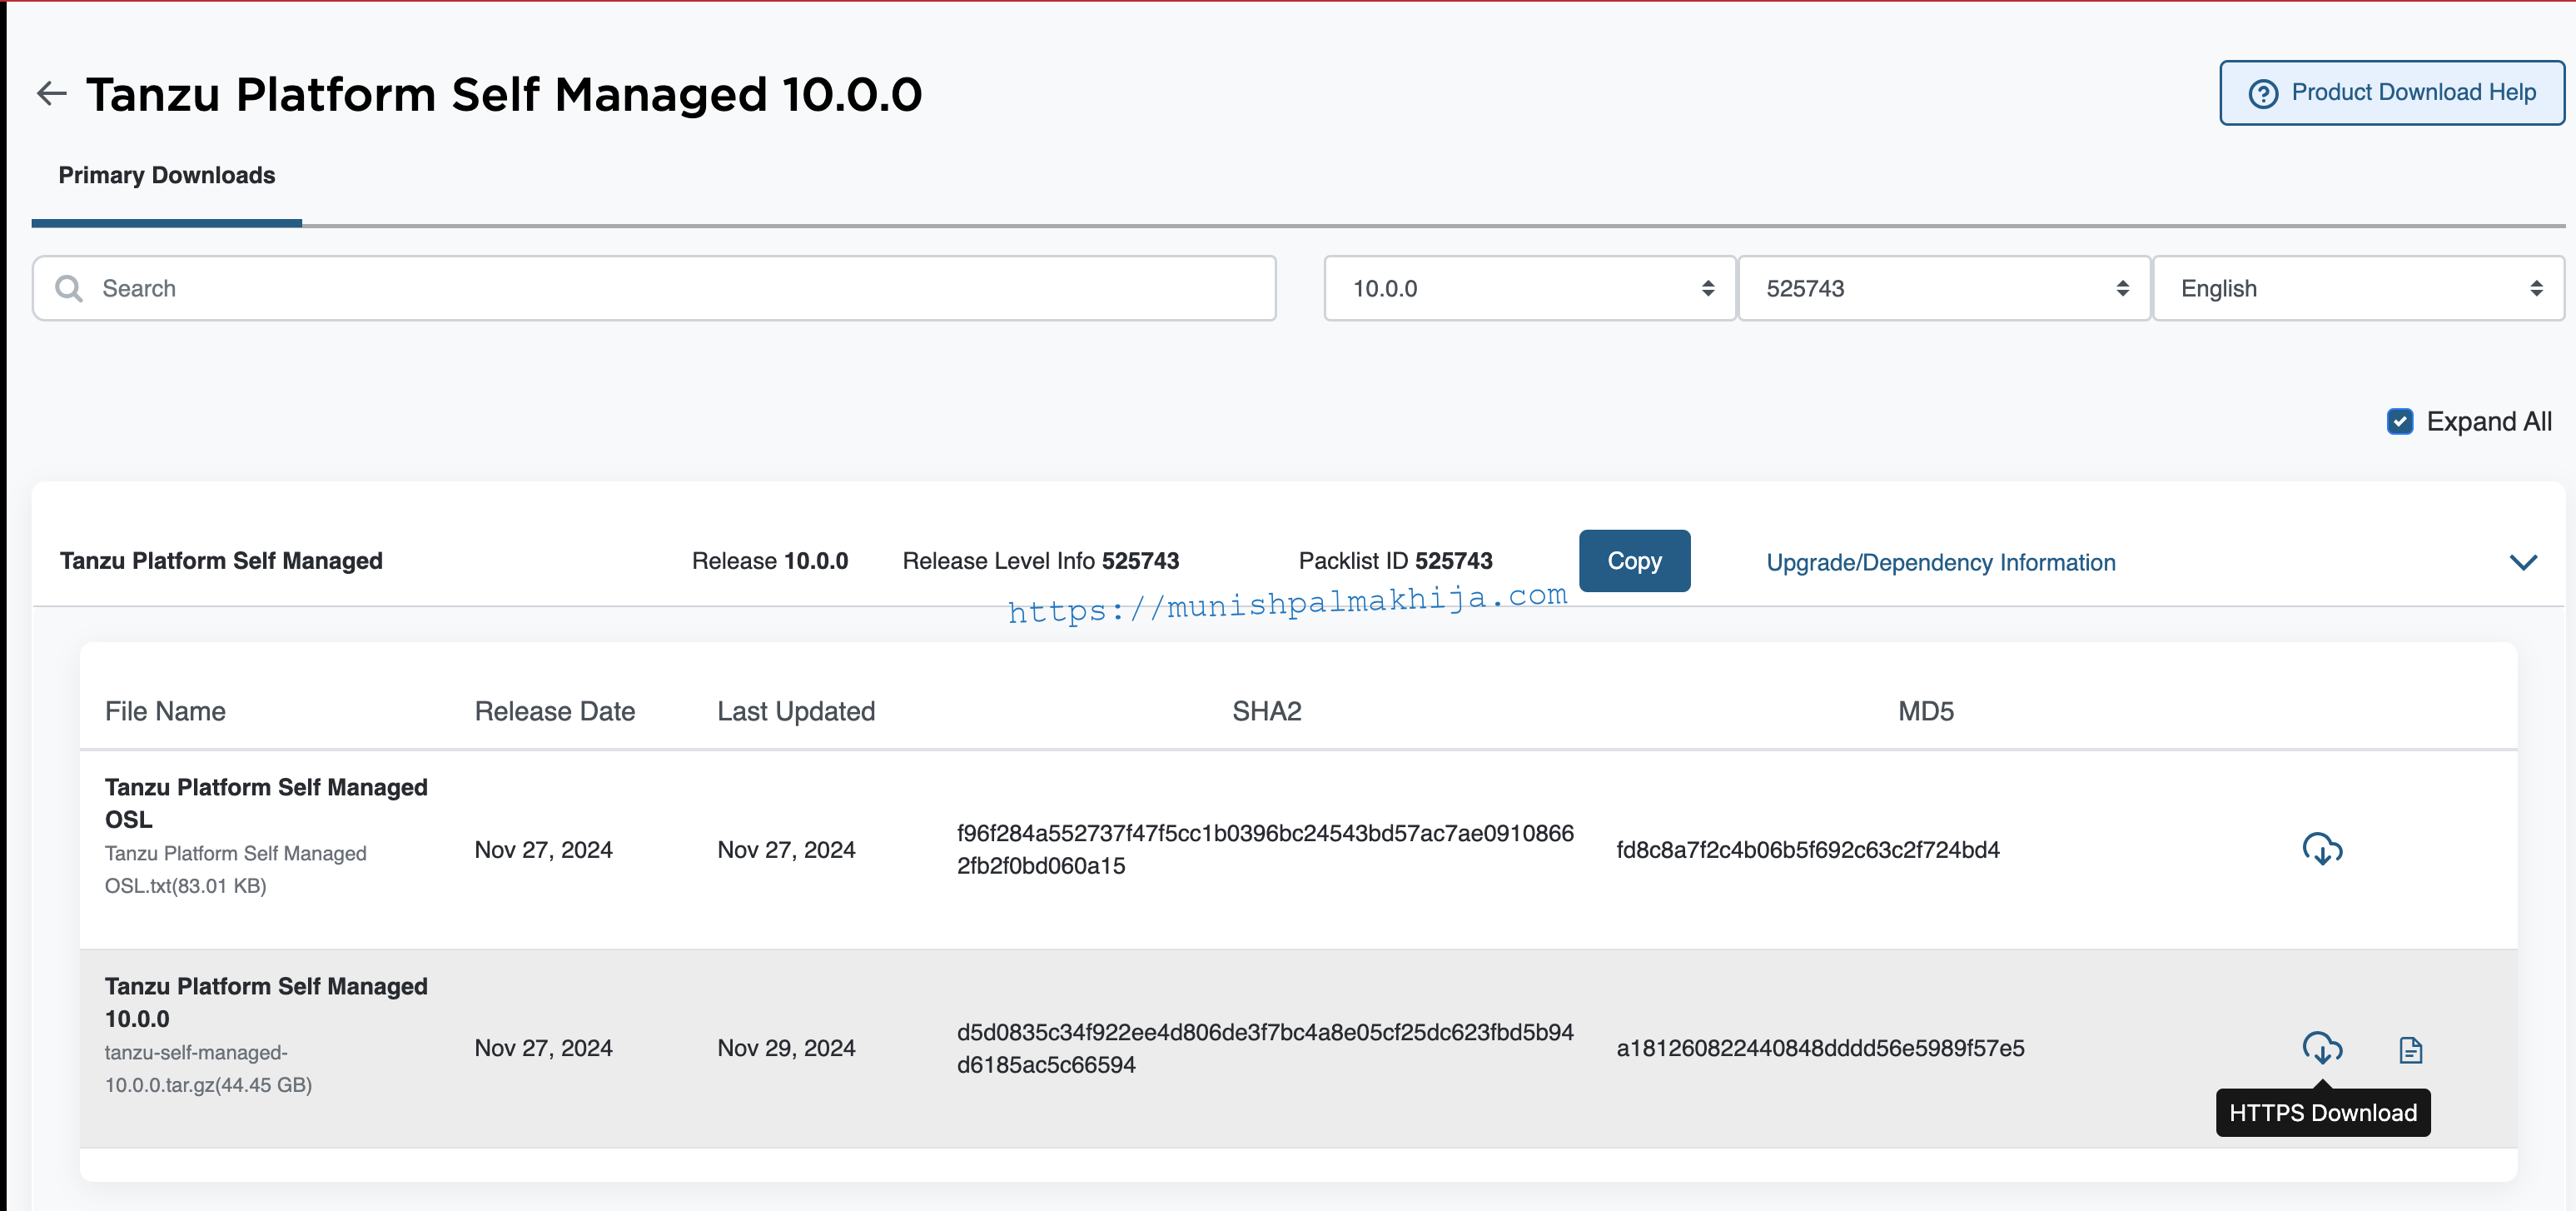
Step 1 – Login to https://support.broadcom.com/
Step 2 – Navigate to Tanzu Platform Self-Managed 10.0.0
https://support.broadcom.com/group/ecx/productfiles?subFamily=Tanzu%20Platform%20Self%20Managed
CLI
Step 1 – Generate Token
https://support.broadcom.com/group/ecx/tanzu-token
Step 2 – Install om cli
https://github.com/pivotal-cf/om
Step 3 – Download the bundle using
om download-product -p tanzu-platform-k8s -o /tmp –file-glob ‘*10.0.0.tar.gz’ –product-version 10.0.0 –pivnet-api-token xxxxxxxx

Extract the Install Bundle
Step 1 – Create new directory for the build
mkdir ./tanzu-installer
Step 2- Extract the installer
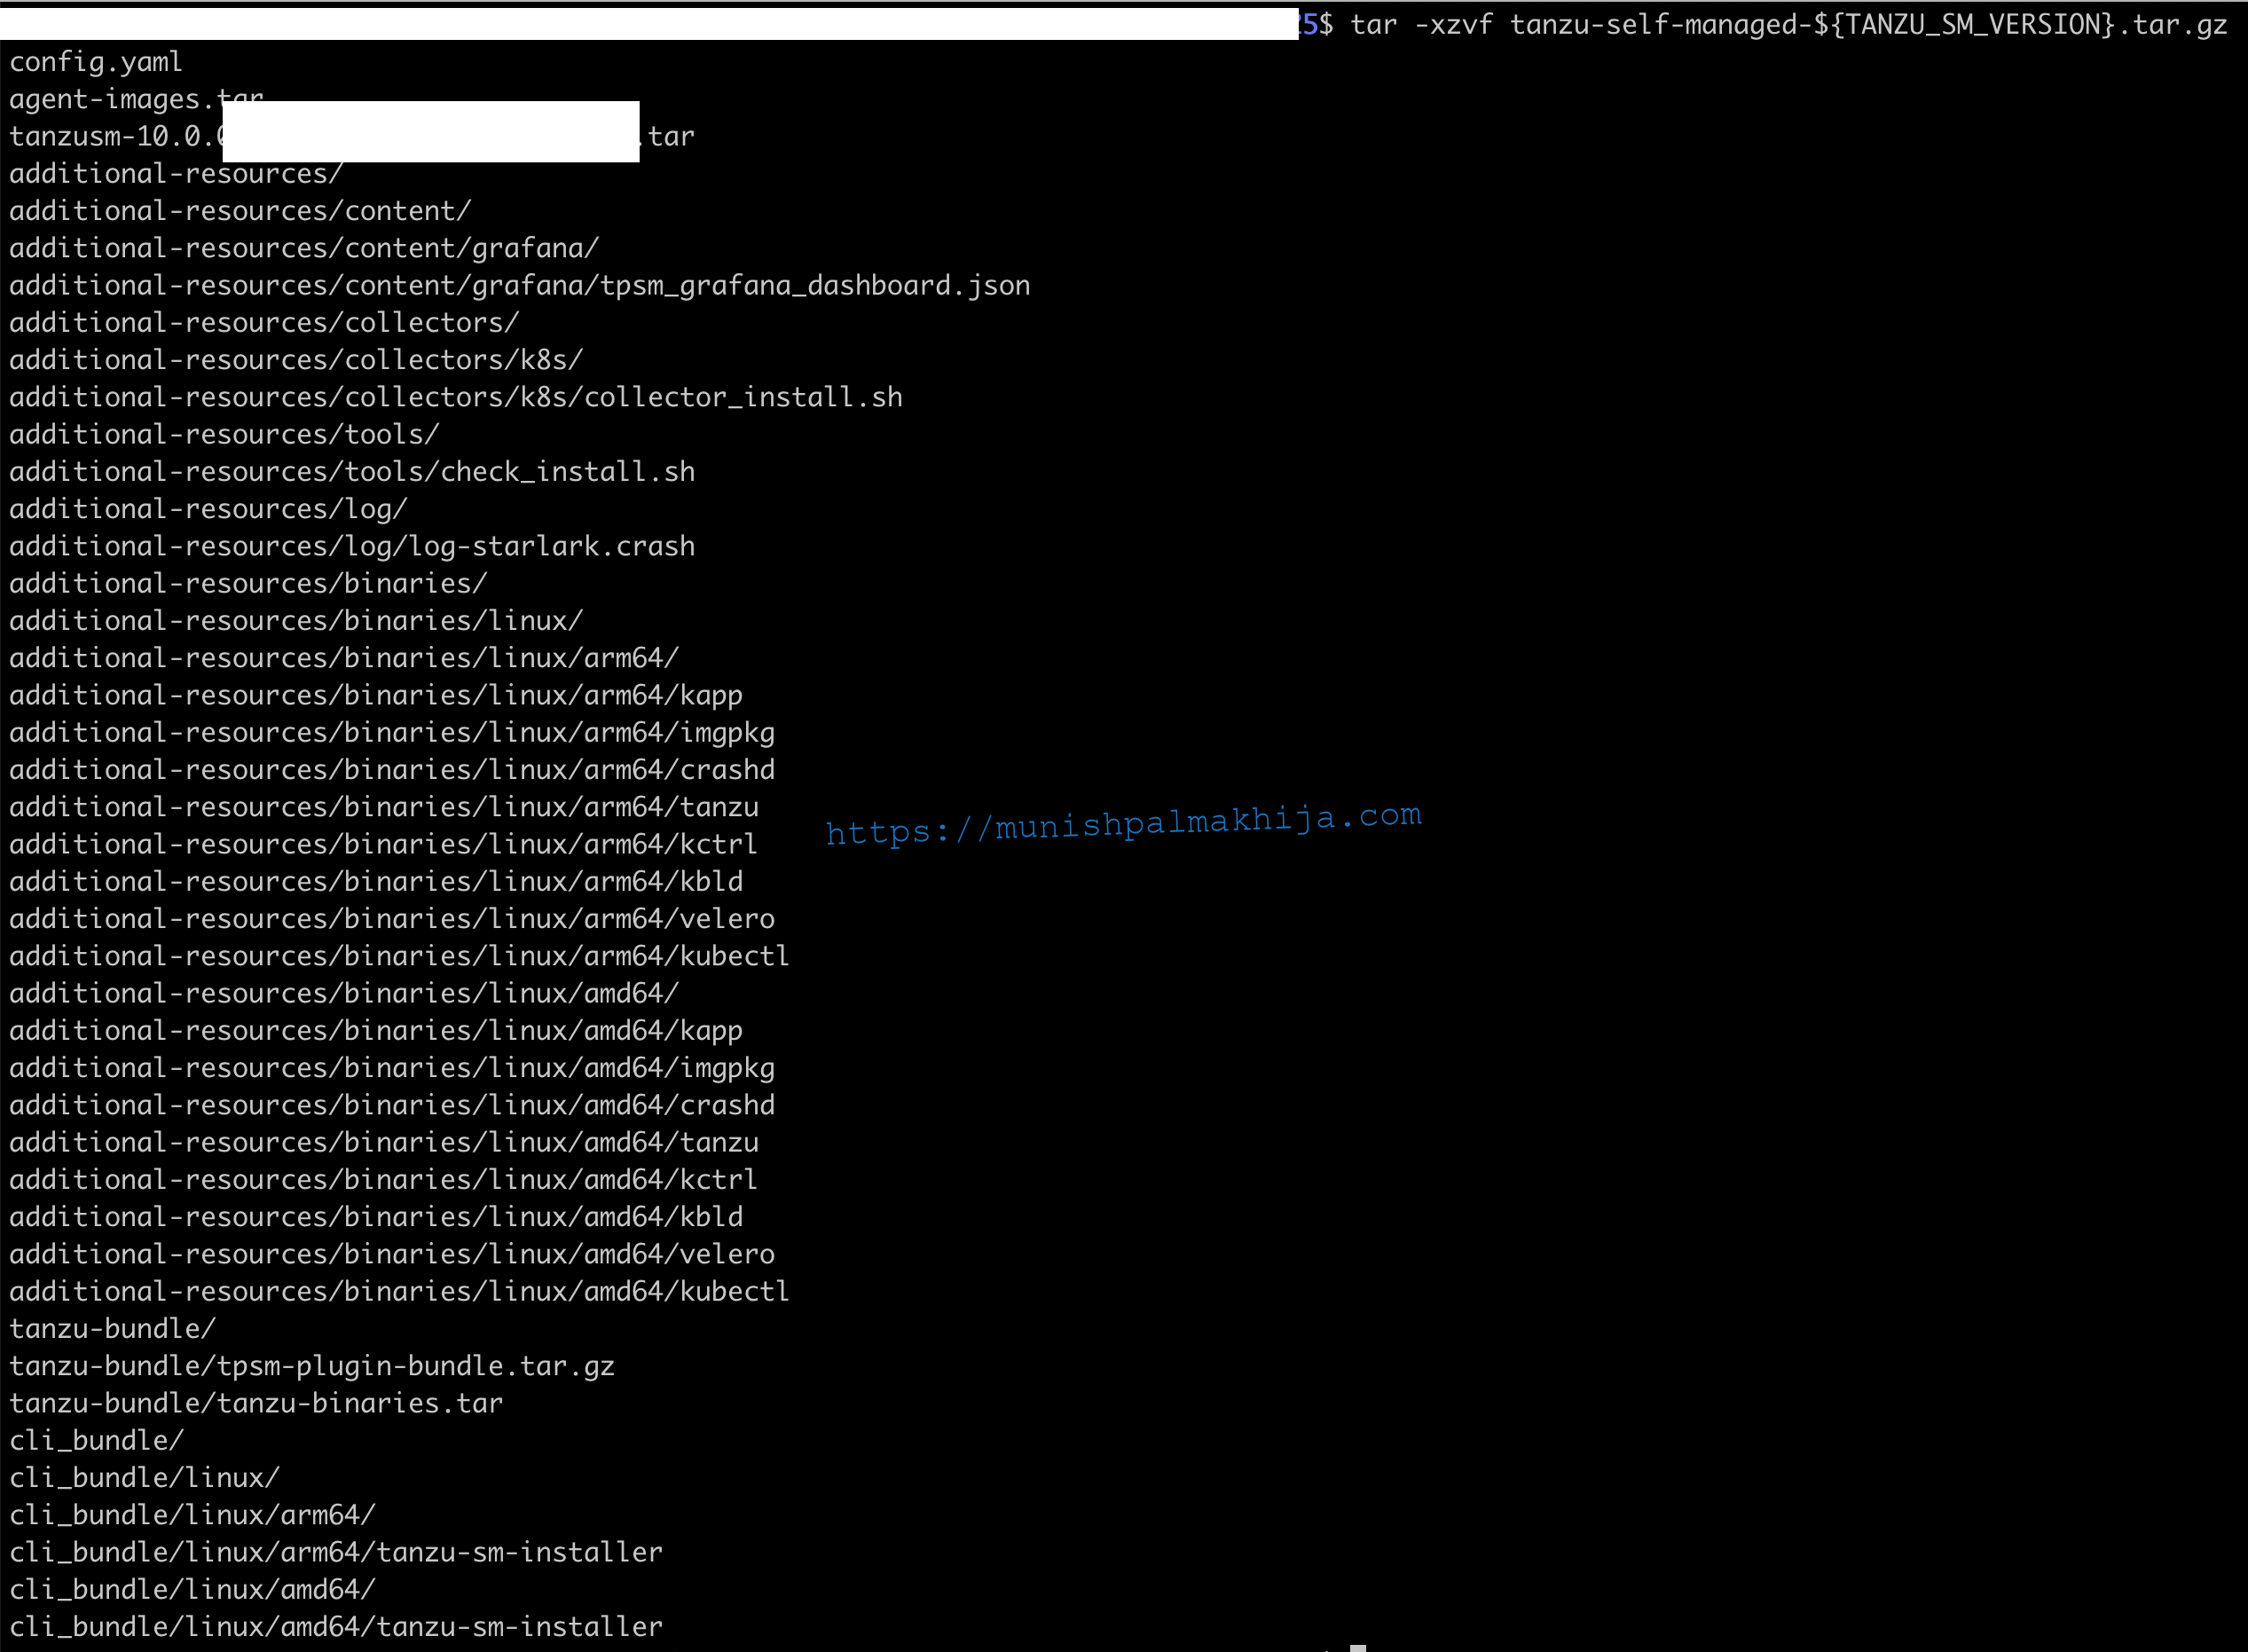
tar -xzvf <INSTALLER-FILENAME>.tar.gz ./tanzu-installer
Step 3 – Verify files
ls -l ./tanzu-installer
The installer comes with the following tools which will be installed during the installation
- kapp
- imgpkg
- crashd
- tanzu cli
- kctrl
- kbld
- velero
- kubectl
Prepare YAML file
The user needs to modify the following details in config.yaml
Step 1 – Provide Ingress details
The recommendation is to provide FQDN and static IP from the Loadbalancer Pool.
ingress:
loadBalancerIP: “Static_IP”
host: “Sample_Value_.com”
The installer will generate a self-signed certificate if no values are provided.
Step 2 – Update Trivydb repository on Harbor Private Registry
Location of the Trivy database as mentioned above
trivy:
dbRepository: “HARBOR_CONTAINER_REGISTRY_PATH”
allowInsecureConnections: true
Step 3 – Specify Identity Provider Settings
In our environment, I have used Open LDAP hence I have provided the following details
login:
ldap:
url: ‘ldaps://openldap.ldap.svc.cluster.local:636/’
certificate: “<open-ldap-certs/ca-cert.pem in previous section>”
credentials:
userDN: ‘cn=admin,dc=tpksm,dc=local’
password: ‘password’
users:
baseDN: ‘dc=tpksm,dc=local’
searchFilter: ‘cn={0}’
mailAttribute: mail
groups:
baseDN: ‘dc=tpksm,dc=local’
searchFilter: member={0}
searchDepth: 10
Step 4 – Specify custom registry certificate for private container registry (Optional if not using self-signed certificate)
Specify custom registry certificate for private container registry (Optional if not using self-signed certificate). Refer previous section if you don’t have it handy.
Please ensure it is in \n format.
CustomRegistryCertificate: “—–BEGIN CERTIFICATE—–\nMIIDzjCCAragAwIBAgIUTz/cXsbsIo3psUN8Elayjwh/ROEwDQYJKoZIhvcNAQEL\n”
Step 5 – Specify the password for the default user (Optional if you want the installer to auto-generate)
defaultUsers:
#Tanzu Platform Admin Details, username: tanzu_platform_admin
admin:
#Tanzu Platform Admin Password, A Random password will be generated if an empty value is provided
#Note that this password cannot be changed later, it is one one-time set ( both system-generated and user-provided one)
password: “”
Step 6 – Specify Org Name for the Platform Installation (Optional)
organization: <Tanzu Platform for K8s Org>
Verify Environment
Export Variables
export KUBECONFIG=<K8S_CLUSTER_FILE_PATH>
export VERSION=<VERSION>
export HARBOR_REGISTRY=<LOCAL_HARBOR_URL>
export HARBOR_REGISTRY_USER=<LOCAL_HARBOR_Password>
export HARBOR_REGISTRY_PWD=<LOCAL_HARBOR_Password>
export
Execute Verify
./cli_bundle/linux/amd64/tanzu-sm-installer verify -f config.yaml \
-u “${HARBOR_REGISTRY_USER}:${HARBOR_REGISTRY_PWD}” \
-r ${HARBOR_REGISTRY}/hub-self-managed/${VERSION}/repo \
–install-version ${VERSION} \
–kubeconfig ${KUBECONFIG}

If you see a warning of missing tools you can ignore that as the installer will take care of installing the required tools
Deploy TPK8 SM
Please ensure the following pre-reqs are validated
- All required variables are exported
- Path to config.yaml as updated in the previous section
- Able to access the K8s cluster where TPK8 SM is going to be installed
Installer will push images to the private container registry (harbor). After the images are pushed successfully, it should take approximately 30 minutes to install.
./cli_bundle/linux/amd64/tanzu-sm-installer install -f config.yaml \
-u “${HARBOR_REGISTRY_USER}:${HARBOR_REGISTRY_PWD}” \
-r ${HARBOR_REGISTRY}/hub-self-managed/${VERSION}/repo \
–install-version ${VERSION} \
–kubeconfig ${KUBECONFIG}
Post Deploy Config
Step 1 – Push TMC Extensions required for Attaching K8s Clusters
export VERSION=<VERSION>
export HARBOR_REGISTRY=<LOCAL_HARBOR_URL>
export HARBOR_REGISTRY_USER=<LOCAL_HARBOR_Password>
export HARBOR_REGISTRY_PWD=<LOCAL_HARBOR_Password>
./cli_bundle/linux/amd64/tanzu-sm-installer push tmc-extensions \
-a “${HARBOR_REGISTRY_USER}:${HARBOR_REGISTRY_PWD}” \
-r ${HARBOR_REGISTRY}/hub-self-managed/${VERSION}/repo \
-f agent-images.tar \
–kubeconfig ${KUBECONFIG}
Step 2 – Push tanzu cli plugins
./cli_bundle/linux/amd64/tanzu-sm-installer push tanzu-plugins \
-a “${HARBOR_REGISTRY_USER}:${HARBOR_REGISTRY_PWD}” \
-r ${HARBOR_REGISTRY}/hub-self-managed/${VERSION}/repo \
-i tanzu-bundle/tpsm-plugin-bundle.tar.gz
Access the UI
Open the Web browser and navigate to https://<ingres_fqdn_specified_in_yaml>


nicely done @munish