
In this blog, I will walk through the following
- Features & Benefits of Tanzu Data Management Console (TDMC)
- TDMC Architecture Diagram
- Installation Pre-Requisites for TDMC
- Installation Procedure
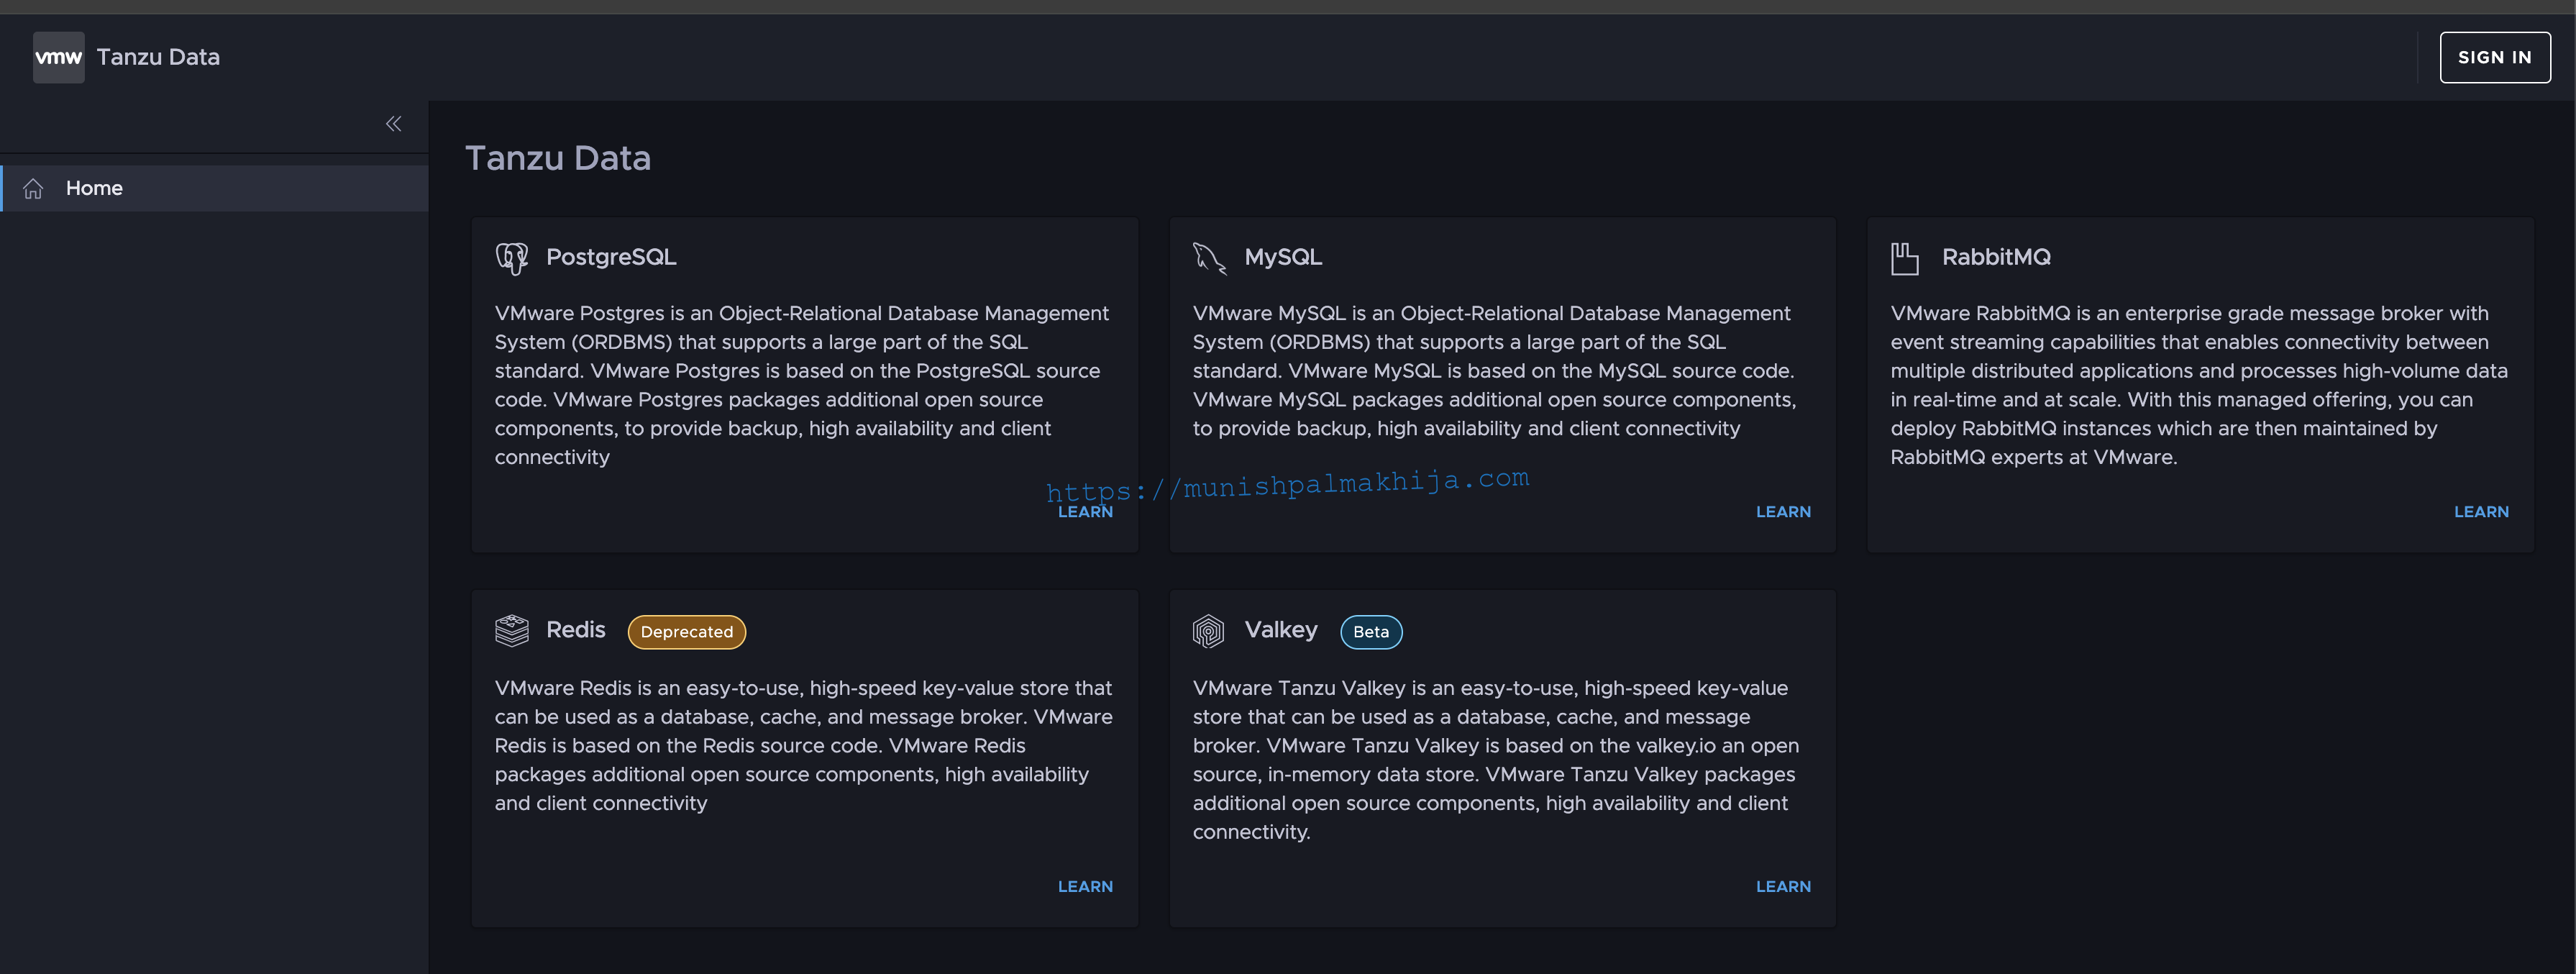
What is VMware Tanzu Data Management Console
VMware Tanzu Data Management Console (TDMC) offers database and data services management for Kubernetes. It provides a data-as-a-service for on-demand provisioning and automated management of databases (PostgreSQL and MySQL databases) and other data services like RabbitMQ and Valkey in Kubernetes environments.
It provides the following features and benefits
Features
| Multi-Cloud Support | Unified orchestration and automation of data services on Kubernetes clusters running on various clouds (TKGs, TKGm, GKE, Openshift) |
| Provisioning | Simplified provisioning of different configurations for data services with pre-defined or custom t-shirt sizing of compute memory and storage resources |
| Scaling | Modify instances depending on usage (scale up, scale down, disk extension) |
| Backup | On-demand Backup of provisioned data services on Built-in Object Store and external locations like S3 or MinIO. |
| Observability | Access to metrics and logs for deployed data services. |
| Point in Time Recovery (PiTR) | On-Demand point-in-time recovery (PiTR) of Databases |
Benefits
| Simplified Operations | Self Service provisioning data services from UI, API, and automated tools like Terraform; with turn around time of less than an hour |
| Developer-Ready Data Infrastructure | Get the Data Services on demand which developers need to create apps at scale, plus the governance IT admins and DBAs require to manage databases. |
| Peace of Mind | Reduce risks with central security, compliance, support, and lifecycle management. |
VMware Tanzu Data Management Console Architecture
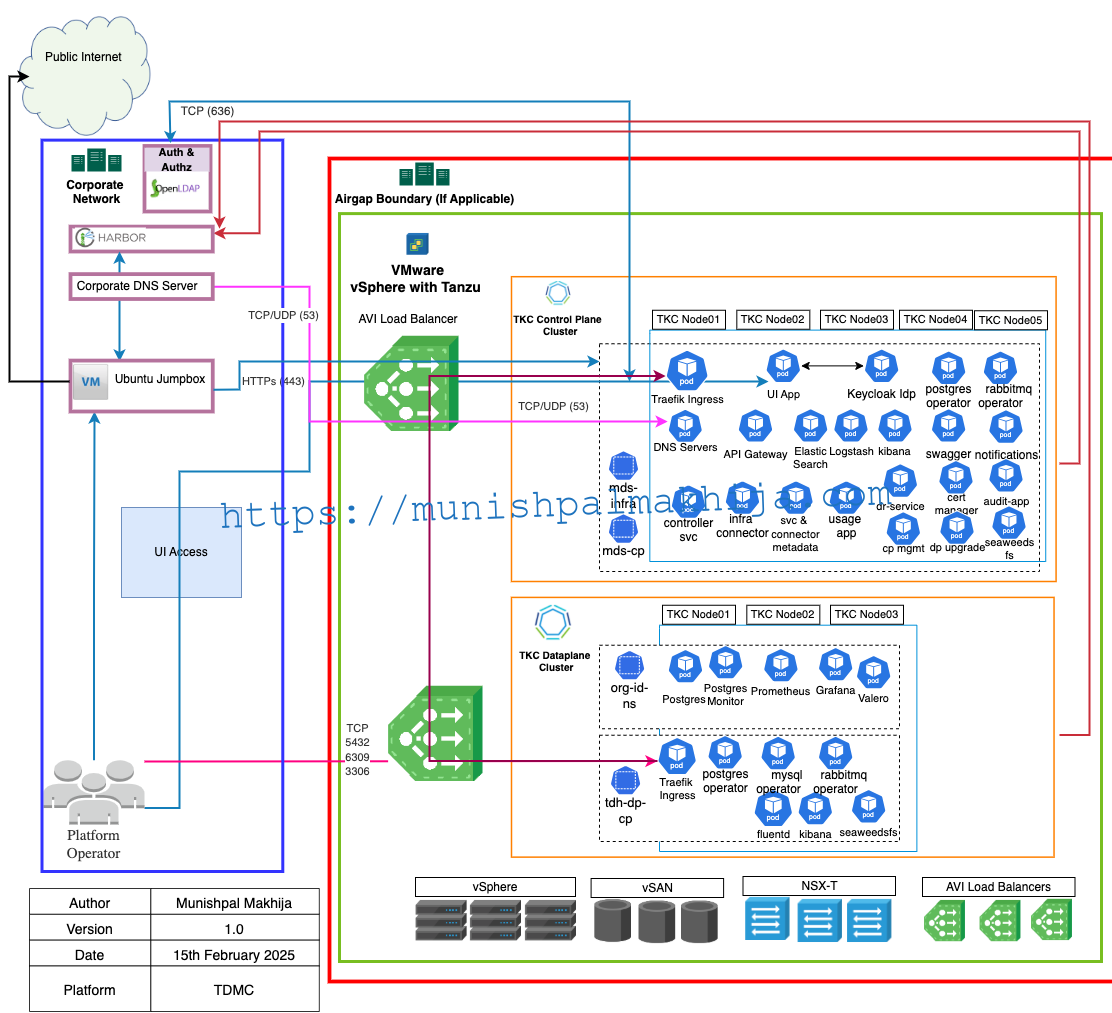
Planning your VMware Tanzu Data Management Console Deployment
The first step is to plan your TDMC deployment depending on your requirements. You will need to select the Installation Size and the supported Kubernetes distributions
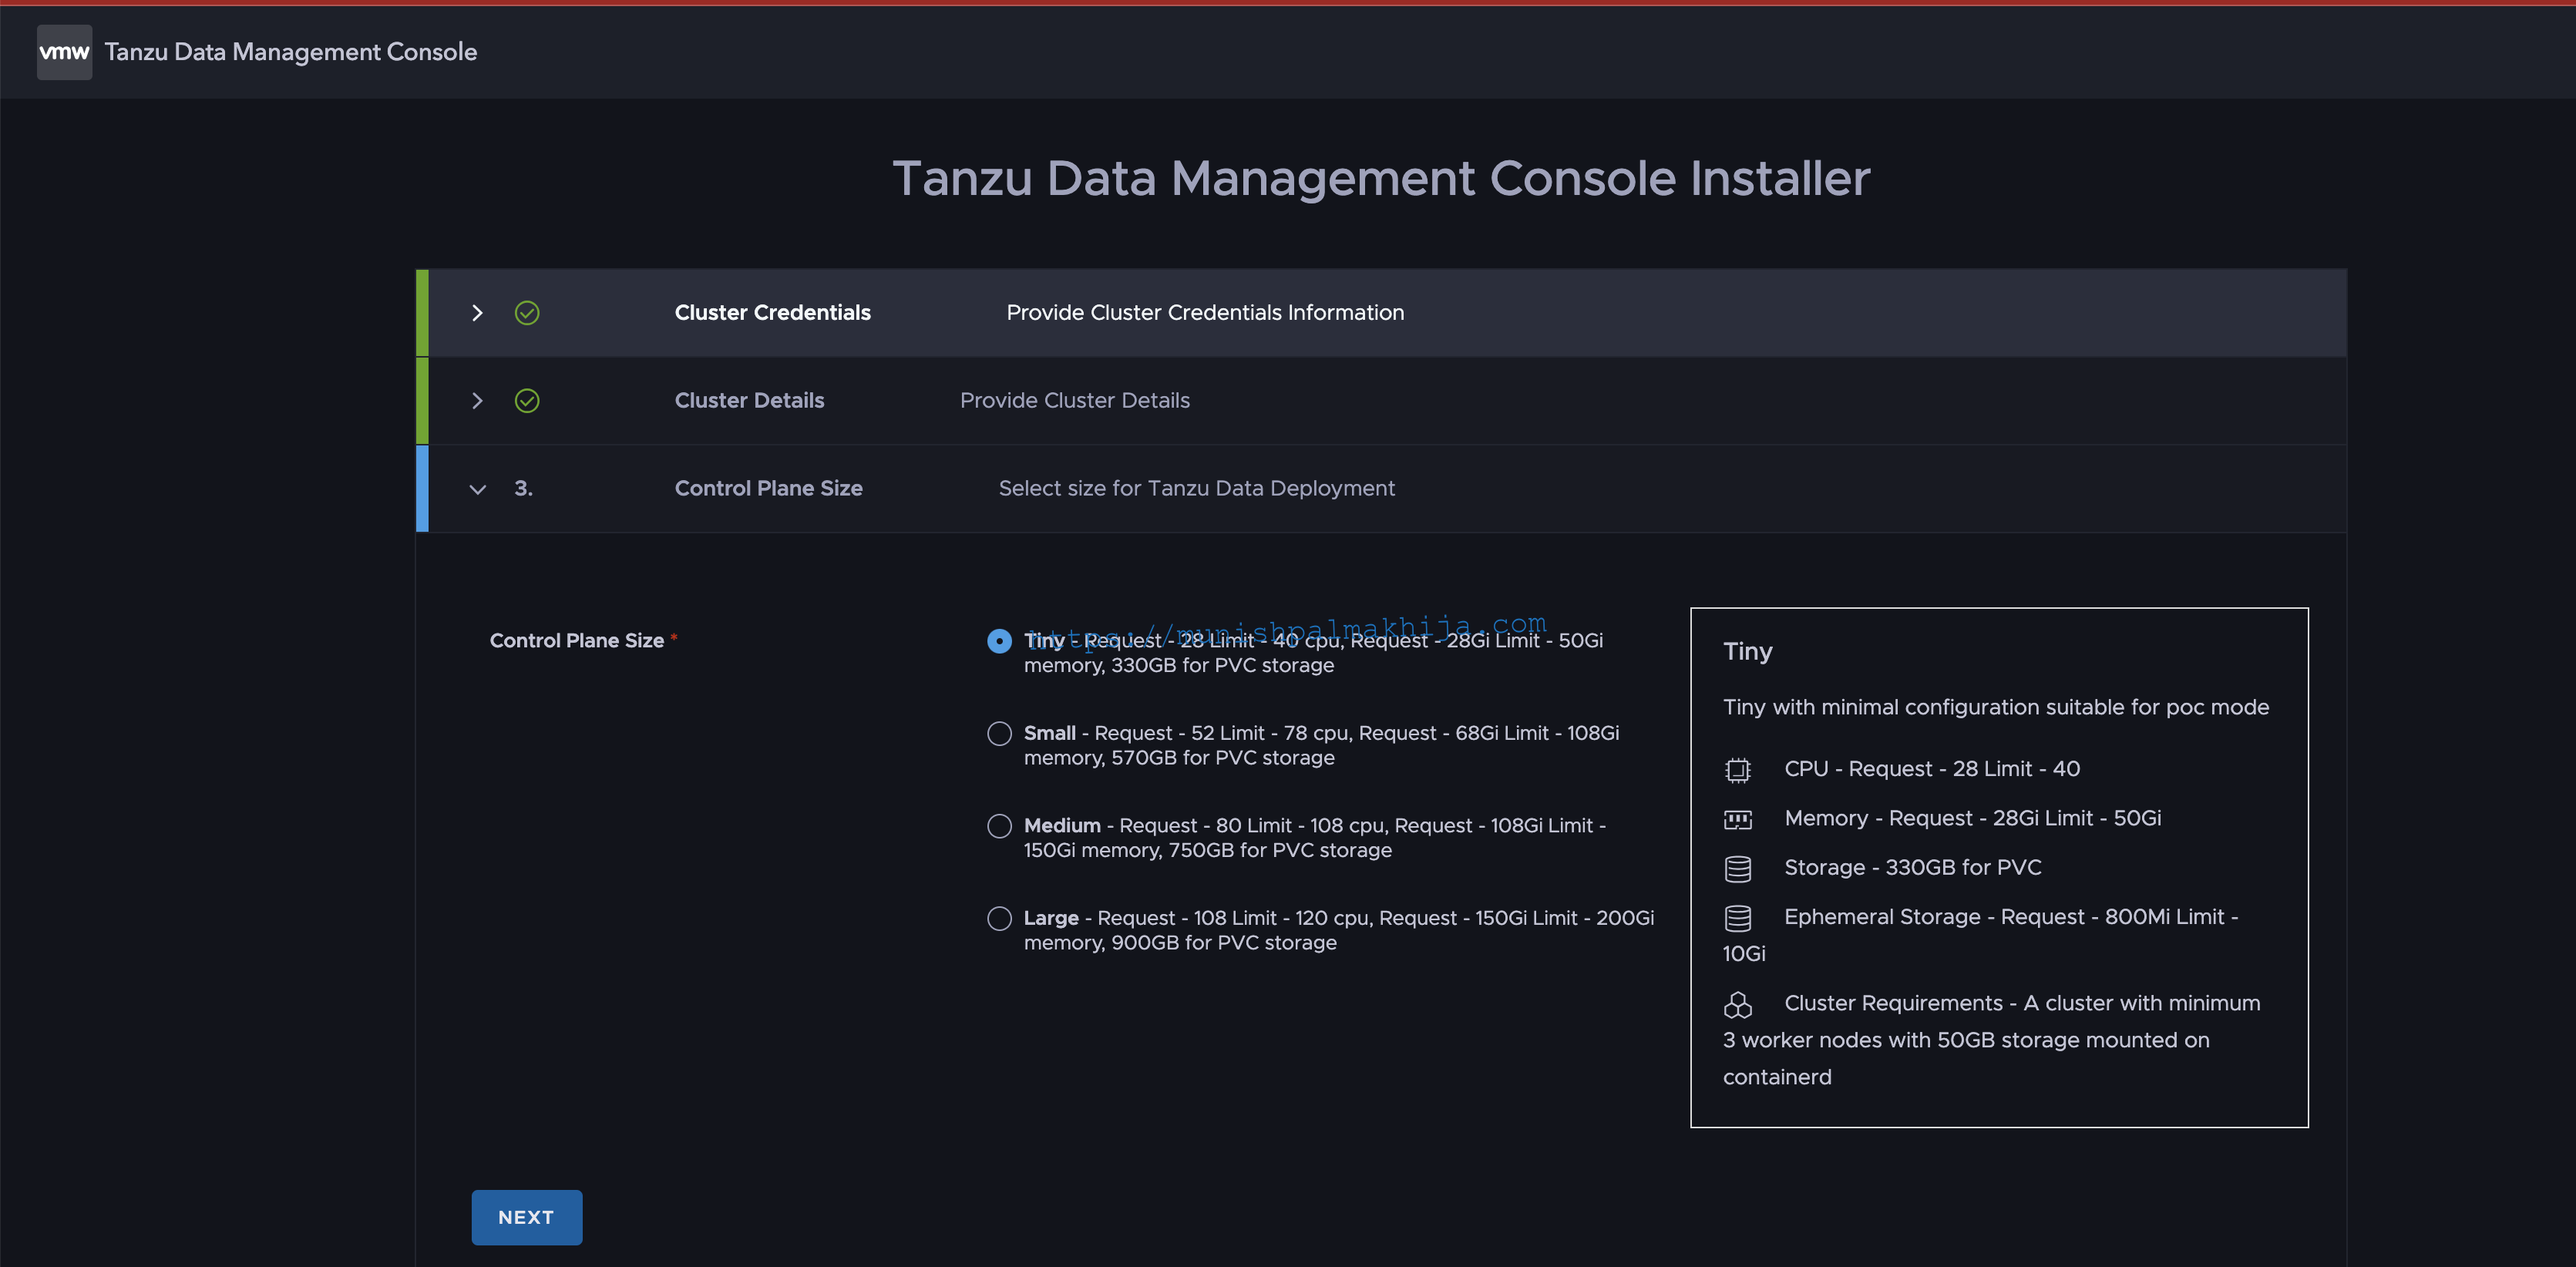
Deployment Size
|
Size |
Minimum K8s Workers |
Resources Required |
| Tiny |
3 |
CPU – 28 vCPU Requests / 40 vCPU Limit Memory – 28 GB Requests / 50 GB Limit PVC Storage – 330 GB |
| Small | 3 |
CPU – 52 vCPU Requests / 78 vCPU Limit Memory – 68 GB Requests / 108 GB Limit PVC Storage – 670 GB |
| Medium | 3 |
CPU – 80 vCPU Requests / 108 vCPU Limit Memory – 108 GB Requests / 150 GB Limit PVC Storage – 750 GB |
| Large |
3 |
CPU – 108 vCPU Requests / 120 vCPU Limit
Memory – 150 GB Requests / 200 GB Limit PVC Storage – 900 GB |
Supported Kubernetes Versions
Following are supported K8s versions for Control Plane Deployment.
Data-plane supported versions are different.
|
Distribution |
K8s Versions |
|
vSphere Kubernetes Service (VKS) previously known as Tanzu Kubernetes Service (TKGs) |
v1.26.5+vmware.2-fips.1-tkg.1** |
| Tanzu Kubernetes Grid Multi-cloud (TKGm) | 2.5.0 Kubernetes versions v1.30, v1.29, v1.28, v1.27 |
|
Google Kubernetes Engine (GKE) |
K8s version 1.30, 1.29, and 1.28 |
|
RedHat Openshift |
K8s version v1.28.7+f1b5f6c |
** I have tested TDMC Control Plane deployment with the following TKRs as well
- TKr 1.28.8 for vSphere 8.x
- TKr 1.29.4 for vSphere 8.x
- TKr 1.30.1 for vSphere 8.x
- TKr 1.31.1 for vSphere 8.x
Pre-Requisites
Before you begin installation you will need to review the following pre-requisites
Kubernetes Clusters
To install TDMC Control Plane you will need Kubernetes Cluster with a supported version with a minimum of 3 workers along with Load Balancer and Storage Class
Load Balancer with Routable IPs
TDMC Control Plane needs at least three to five available IP addresses to be assigned to Kubernetes service type LoadBalancer:
one for ingress and two for DNS (TCP and UDP) for a tiny size control plane, or else four for a high-availability DNS server if the control plane is larger than tiny.
Storage Class
Control Plane requires storage class with read-write once (RWO) mode support to create PVCs for various components
Dedicated Domain for TDMC
A base domain for your Tanzu Data Management Console in your Corporate DNS Server
tdmc.example.com
DNS Delegation from Corporate DNS Server
TDMC deploys its own DNS Server (Bind) and dynamically manages the FQDNs for the required data services hence we need to have DNS delegation configured in the Corporate DNS server to forward domain requests to the TDMC-managed DNS servers
SMTP Server
You will need SMTP details to be configured in TDMC to send invites & notifications
Bootstrap Machine
You will need a machine/VM with the following
- 50 GB of minimum Storage.
- Access to the Internet to download the installer from the Broadcom Support Portal
- Access to Private Container Registry (Harbor in my lab)
- Access to the Kubernetes Cluster where TPK8 SM will be installed
- Various Packages
- Helm Package Manager,
- kubectl,
- kubectl vsphere plugin
Note – In my lab, I have a linux VM with 4 vCPU, 8 GB RAM with 150 GB HDD
Port Requirements
|
Source |
Destination |
Port/Service |
Purpose |
| Bootstrap Machine |
Broadcom Support Portal |
443 (HTTPs) | To download the TDMC bundle |
|
Bootstrap Machine |
TKGs K8s Control Plane Cluster | 6443 (HTTPs) | To install TDMC SM control plane |
|
Bootstrap Machine |
Private Container Registry | 443 (HTTPs) | To push images using tdmc cli
Applicable for Airgapped environment only |
| Bootstrap Machine |
Broadcom Image Registry URLs
|
443 (HTTPs) | To pull images from Broadcom Registry |
| Bootstrap Machine | TKGs K8s Control Plane External IP for DNS Server | 53 (TCP/UDP) | To resolve FQDNs for TDMC components & data services |
| TKGs K8s Control Plane Cluster Nodes | Private Container Registry | 443 (HTTPs) | To pull images
Applicable for Airgapped environment only |
| TKGs K8s Control Plane Cluster Nodes |
Broadcom Image Registry URLs
|
443 (HTTPs) | To pull images
Applicable for Non-Airgapped environment only |
For a detailed list of ports exposed by the TDMC Control Plane on the Kubernetes Cluster. Please refer to the documentation.
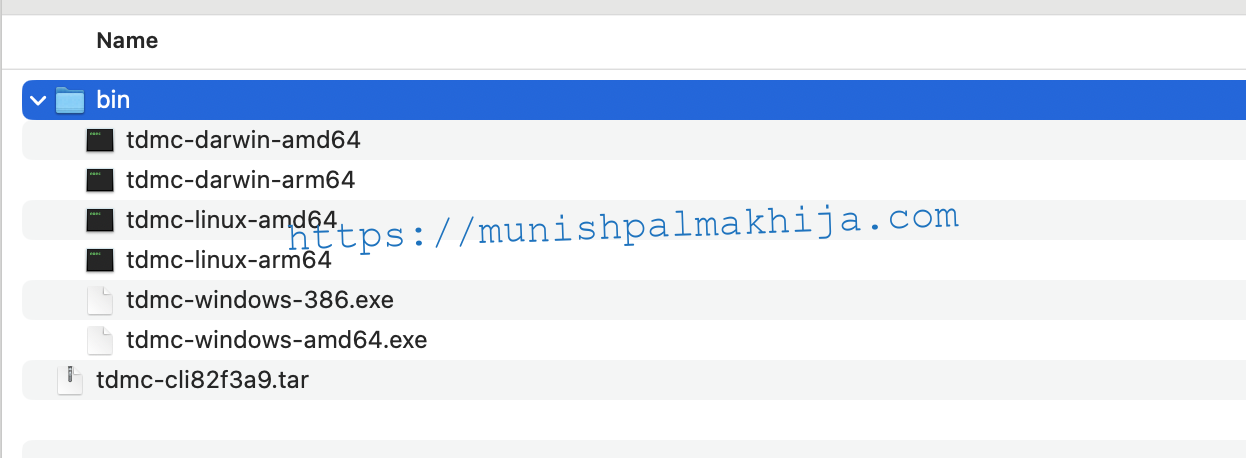
Download & Extract Installer Bundle for VMware Tanzu Data Management Console
You can download and extract the installer bundle for your respective bootstrap machine. It supports
- Mac
- Linux
- Windows
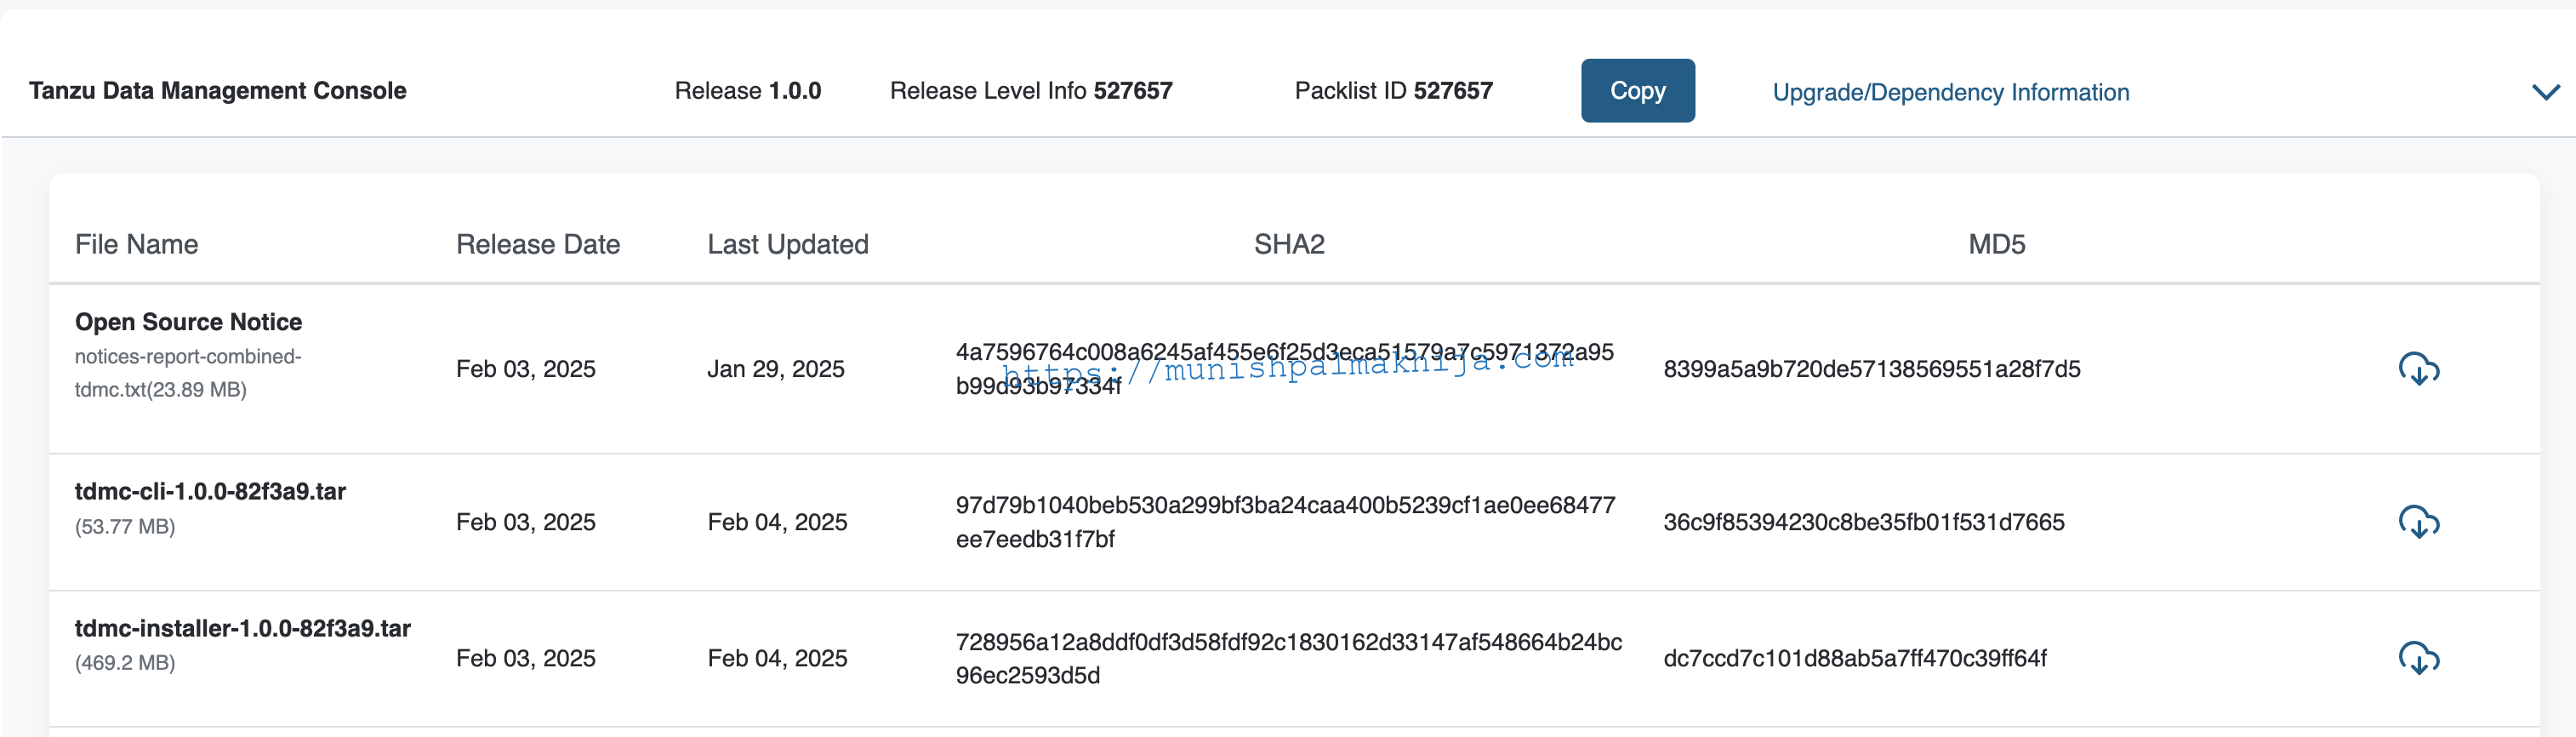
Login to https://support.broadcom.com & navigate to Tanzu Data Management Console
Deploy VMware Tanzu Data Management Console
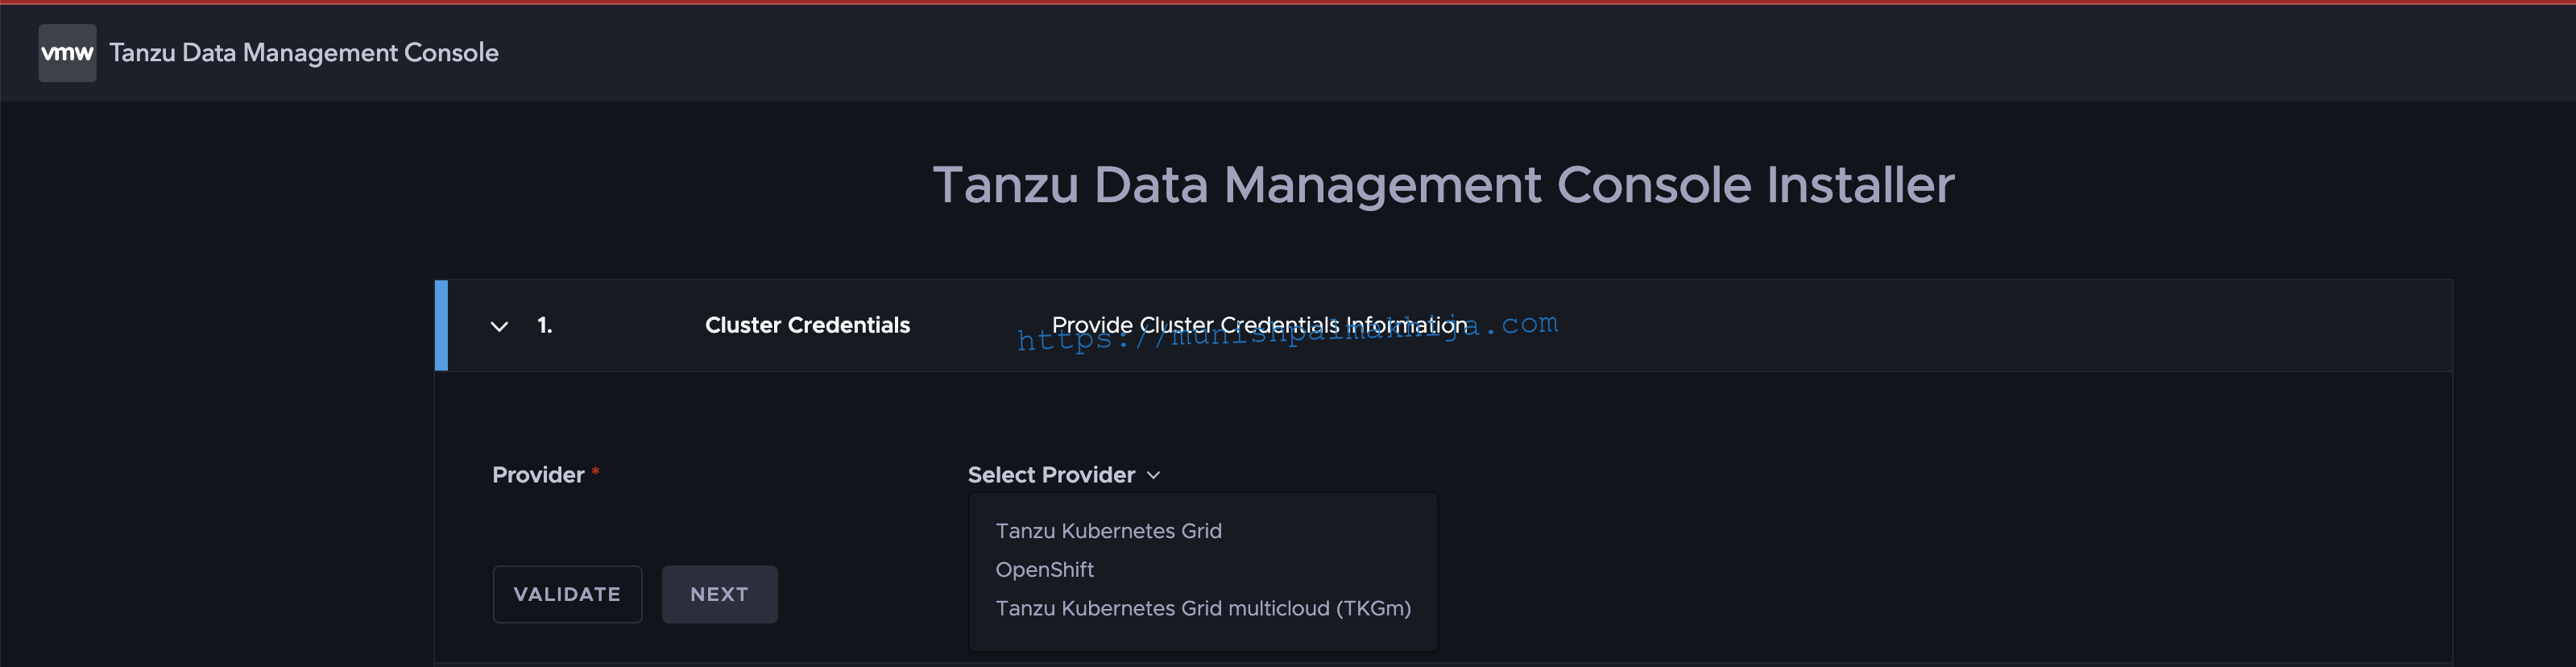
At the command line in a new terminal, initialize the TDMC installer by running the install command:
tdmc-installer install -u
This will open the UI installer
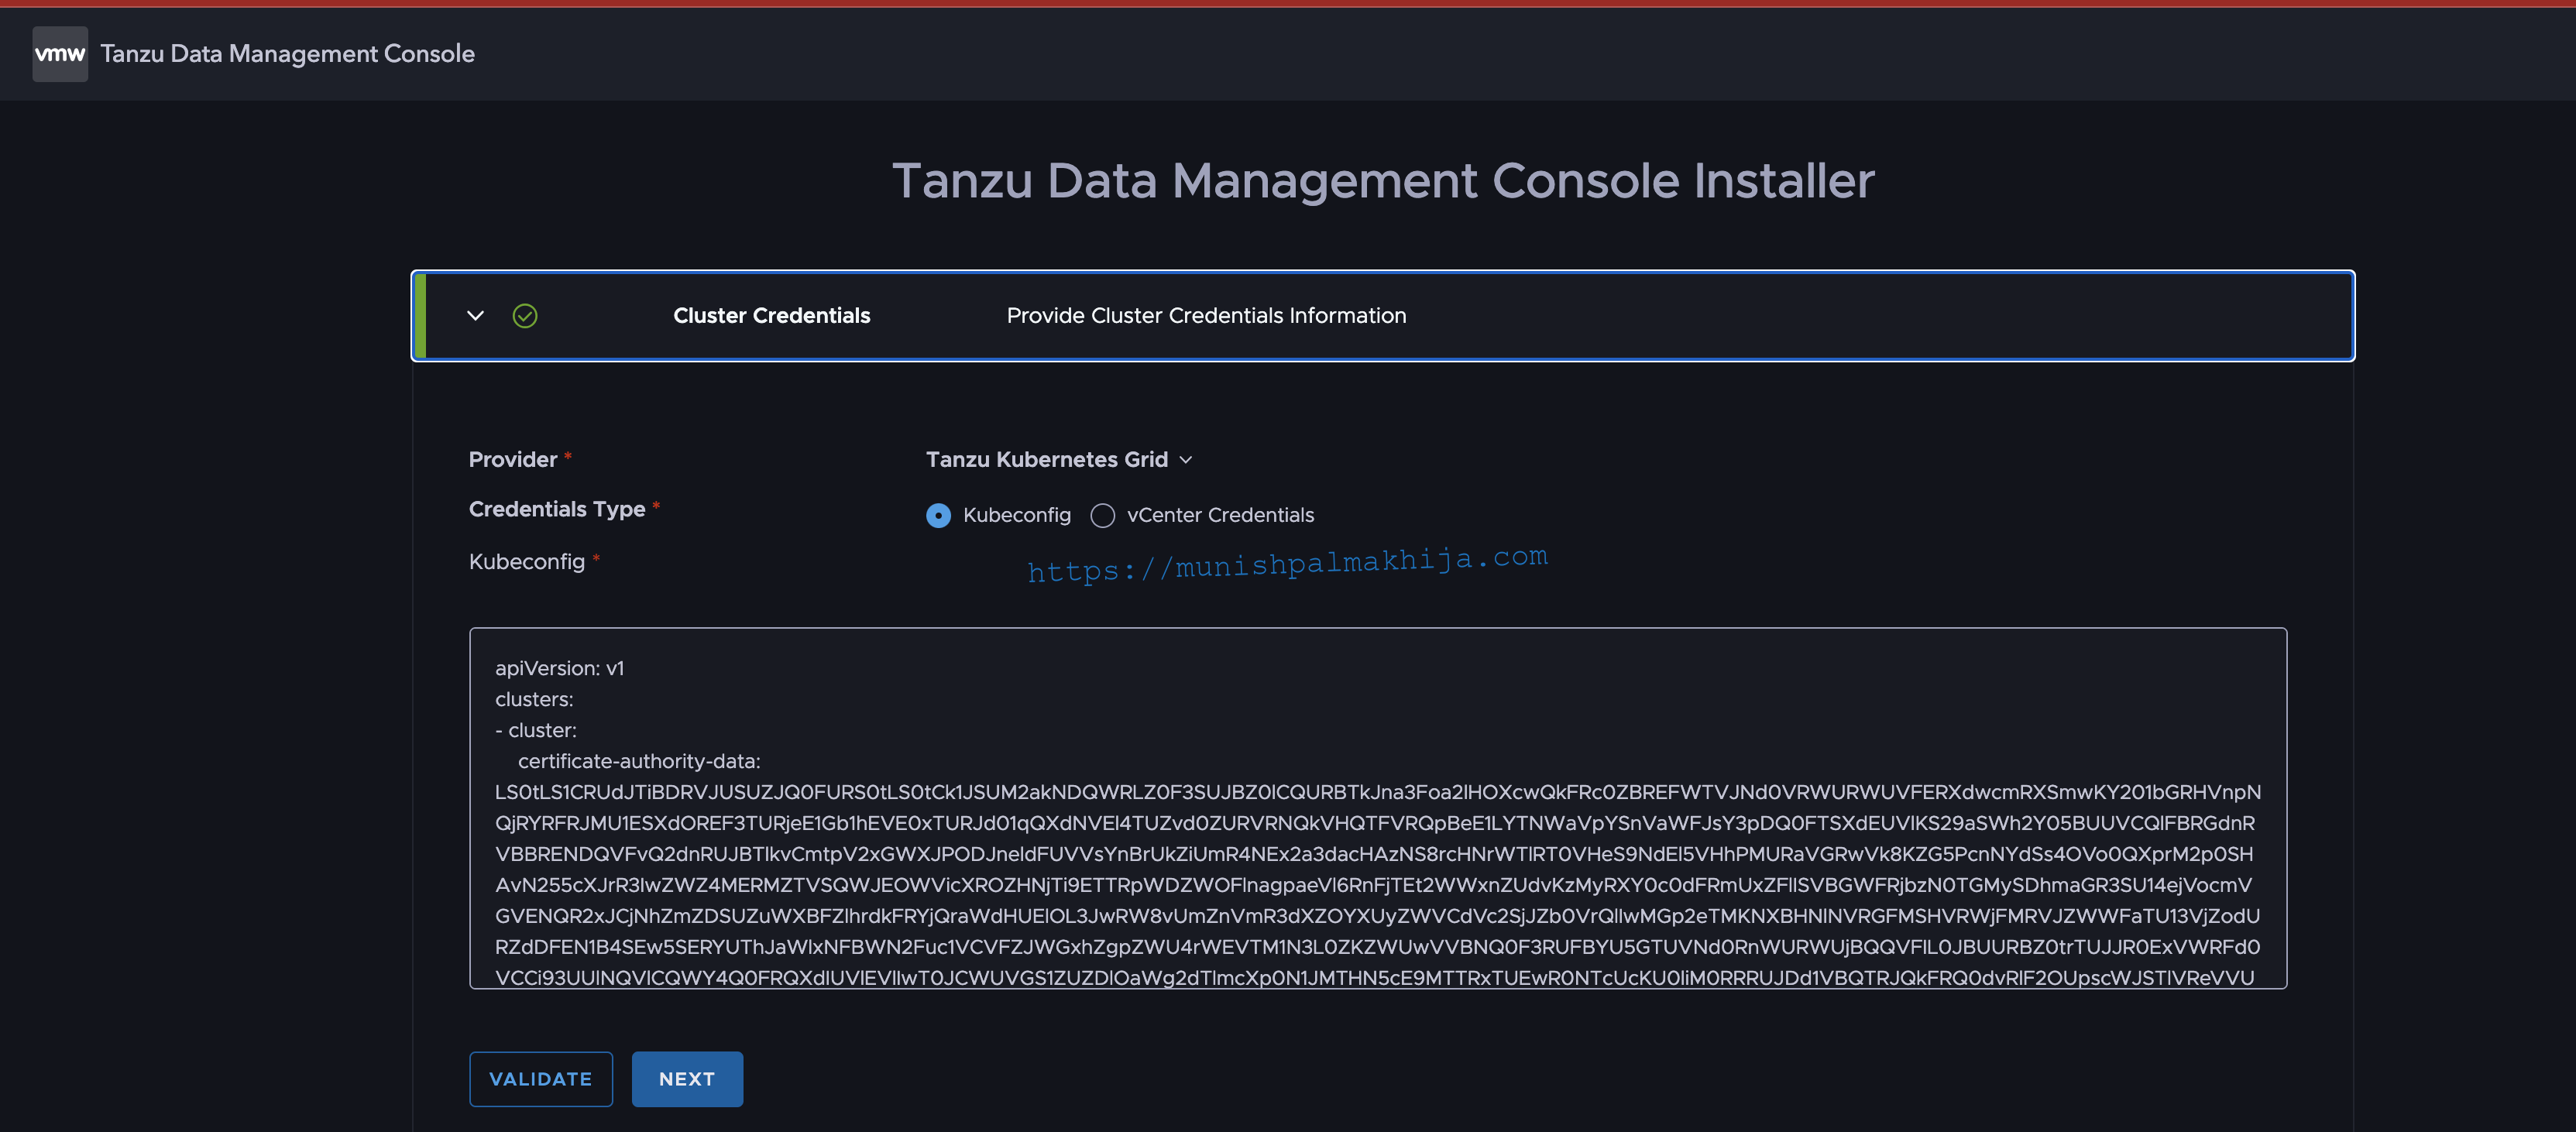
Select Provider.
In my lab, I am going to use Tanzu Kubernetes Grid (TKGs)
Select Credential Type.
In my,lab I will be using KubeConfig for the TKGs Cluster
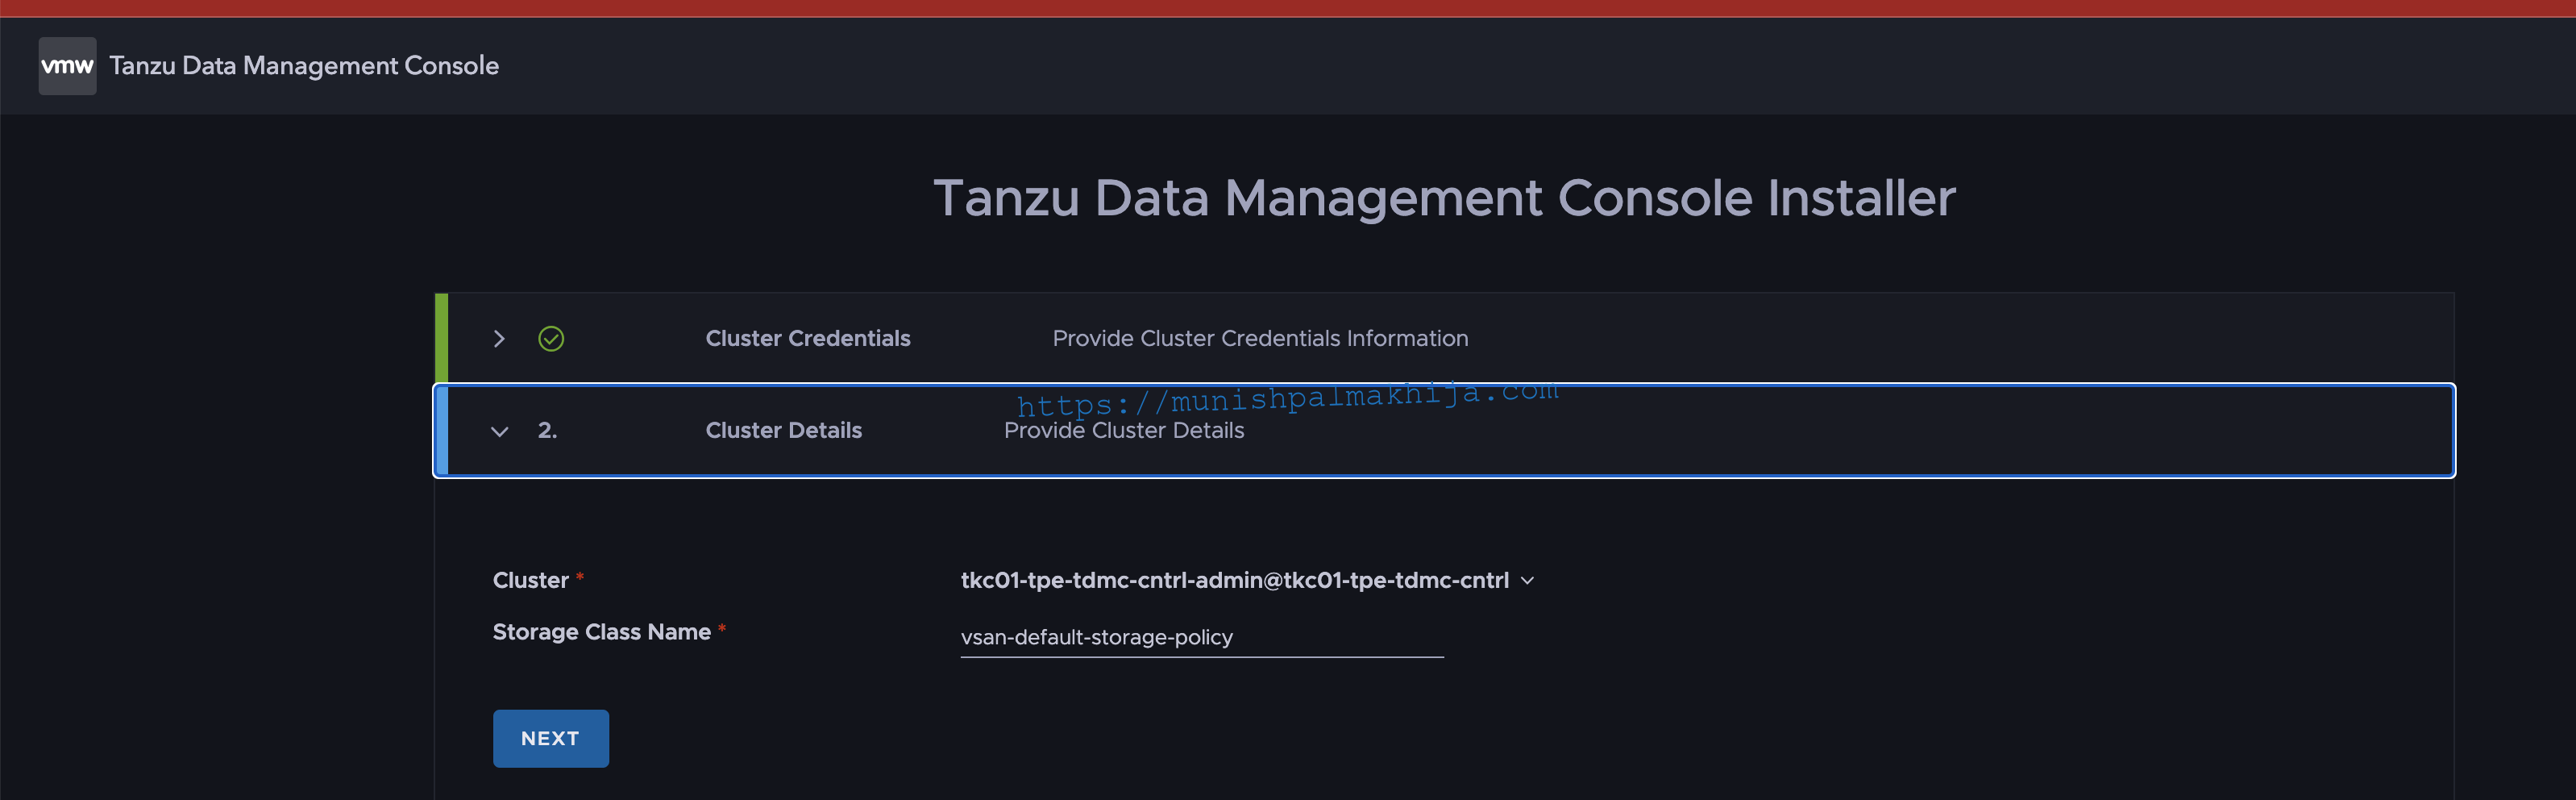
Provide Storage Class Name
This will be used to create PVCs
Select Control Plane Size
In my lab, I have used small size
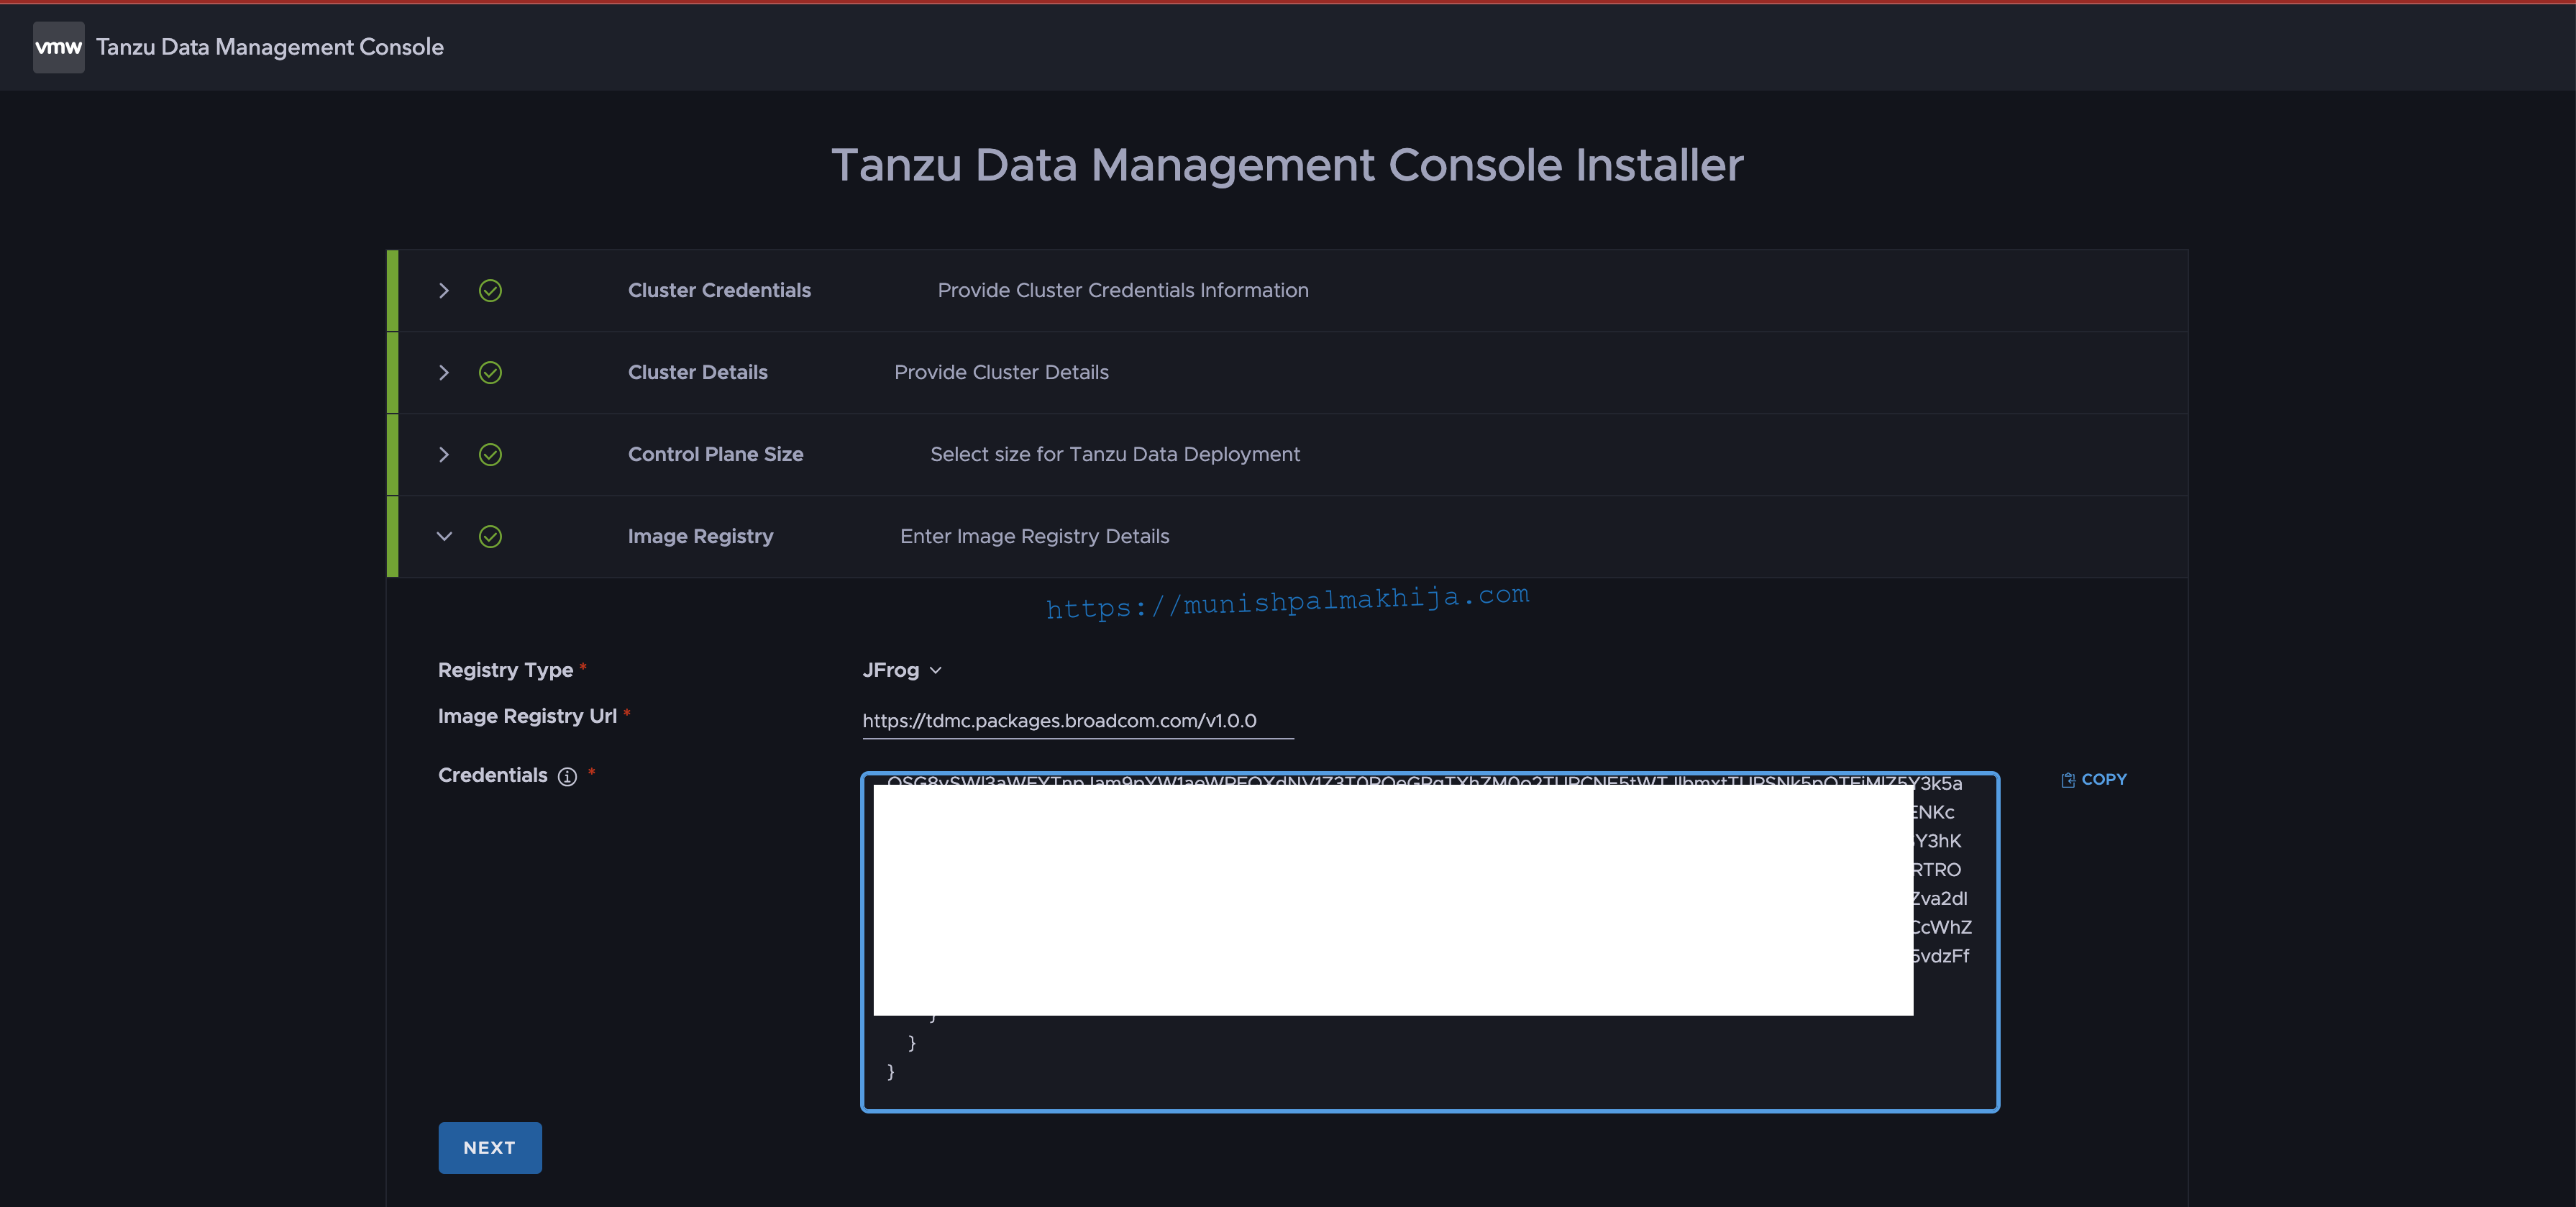
Enter Image Registry Details.
In my lab, I have used the Broadcom Registry
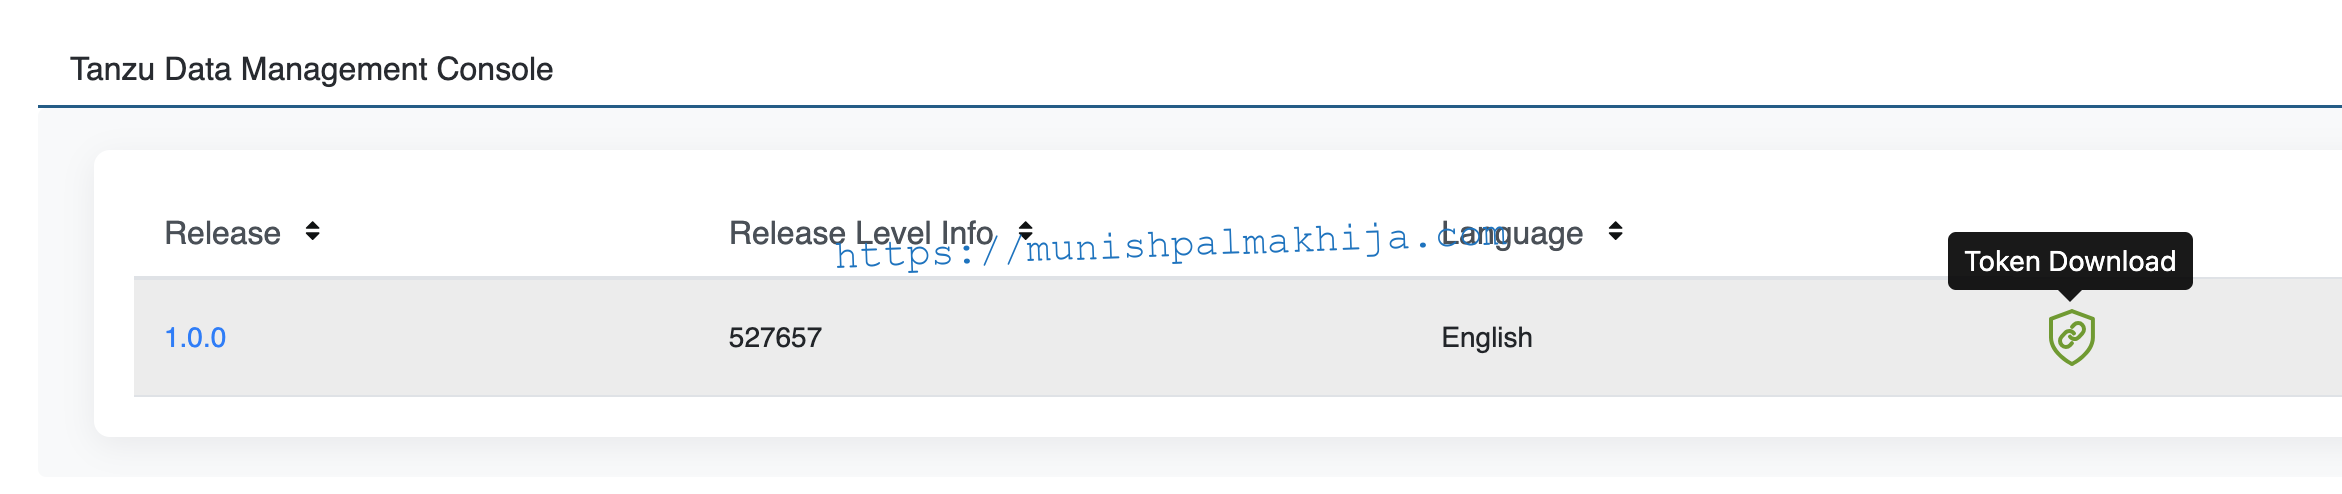
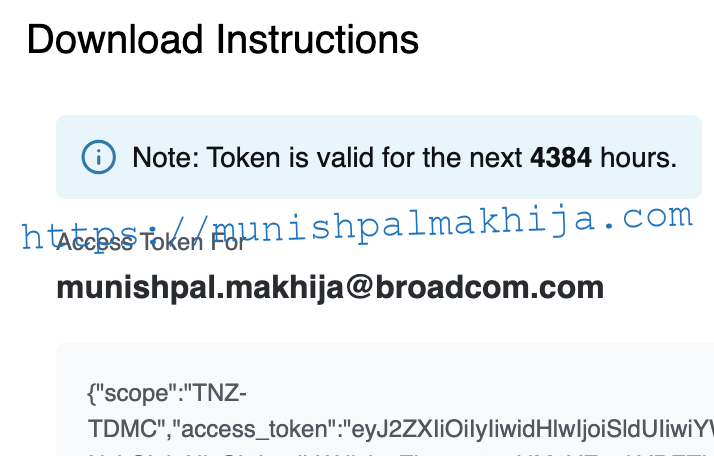
Go to the customer support portal of Broadcom, navigate to Tanzu Data Management Console, and click on the green badge to download token
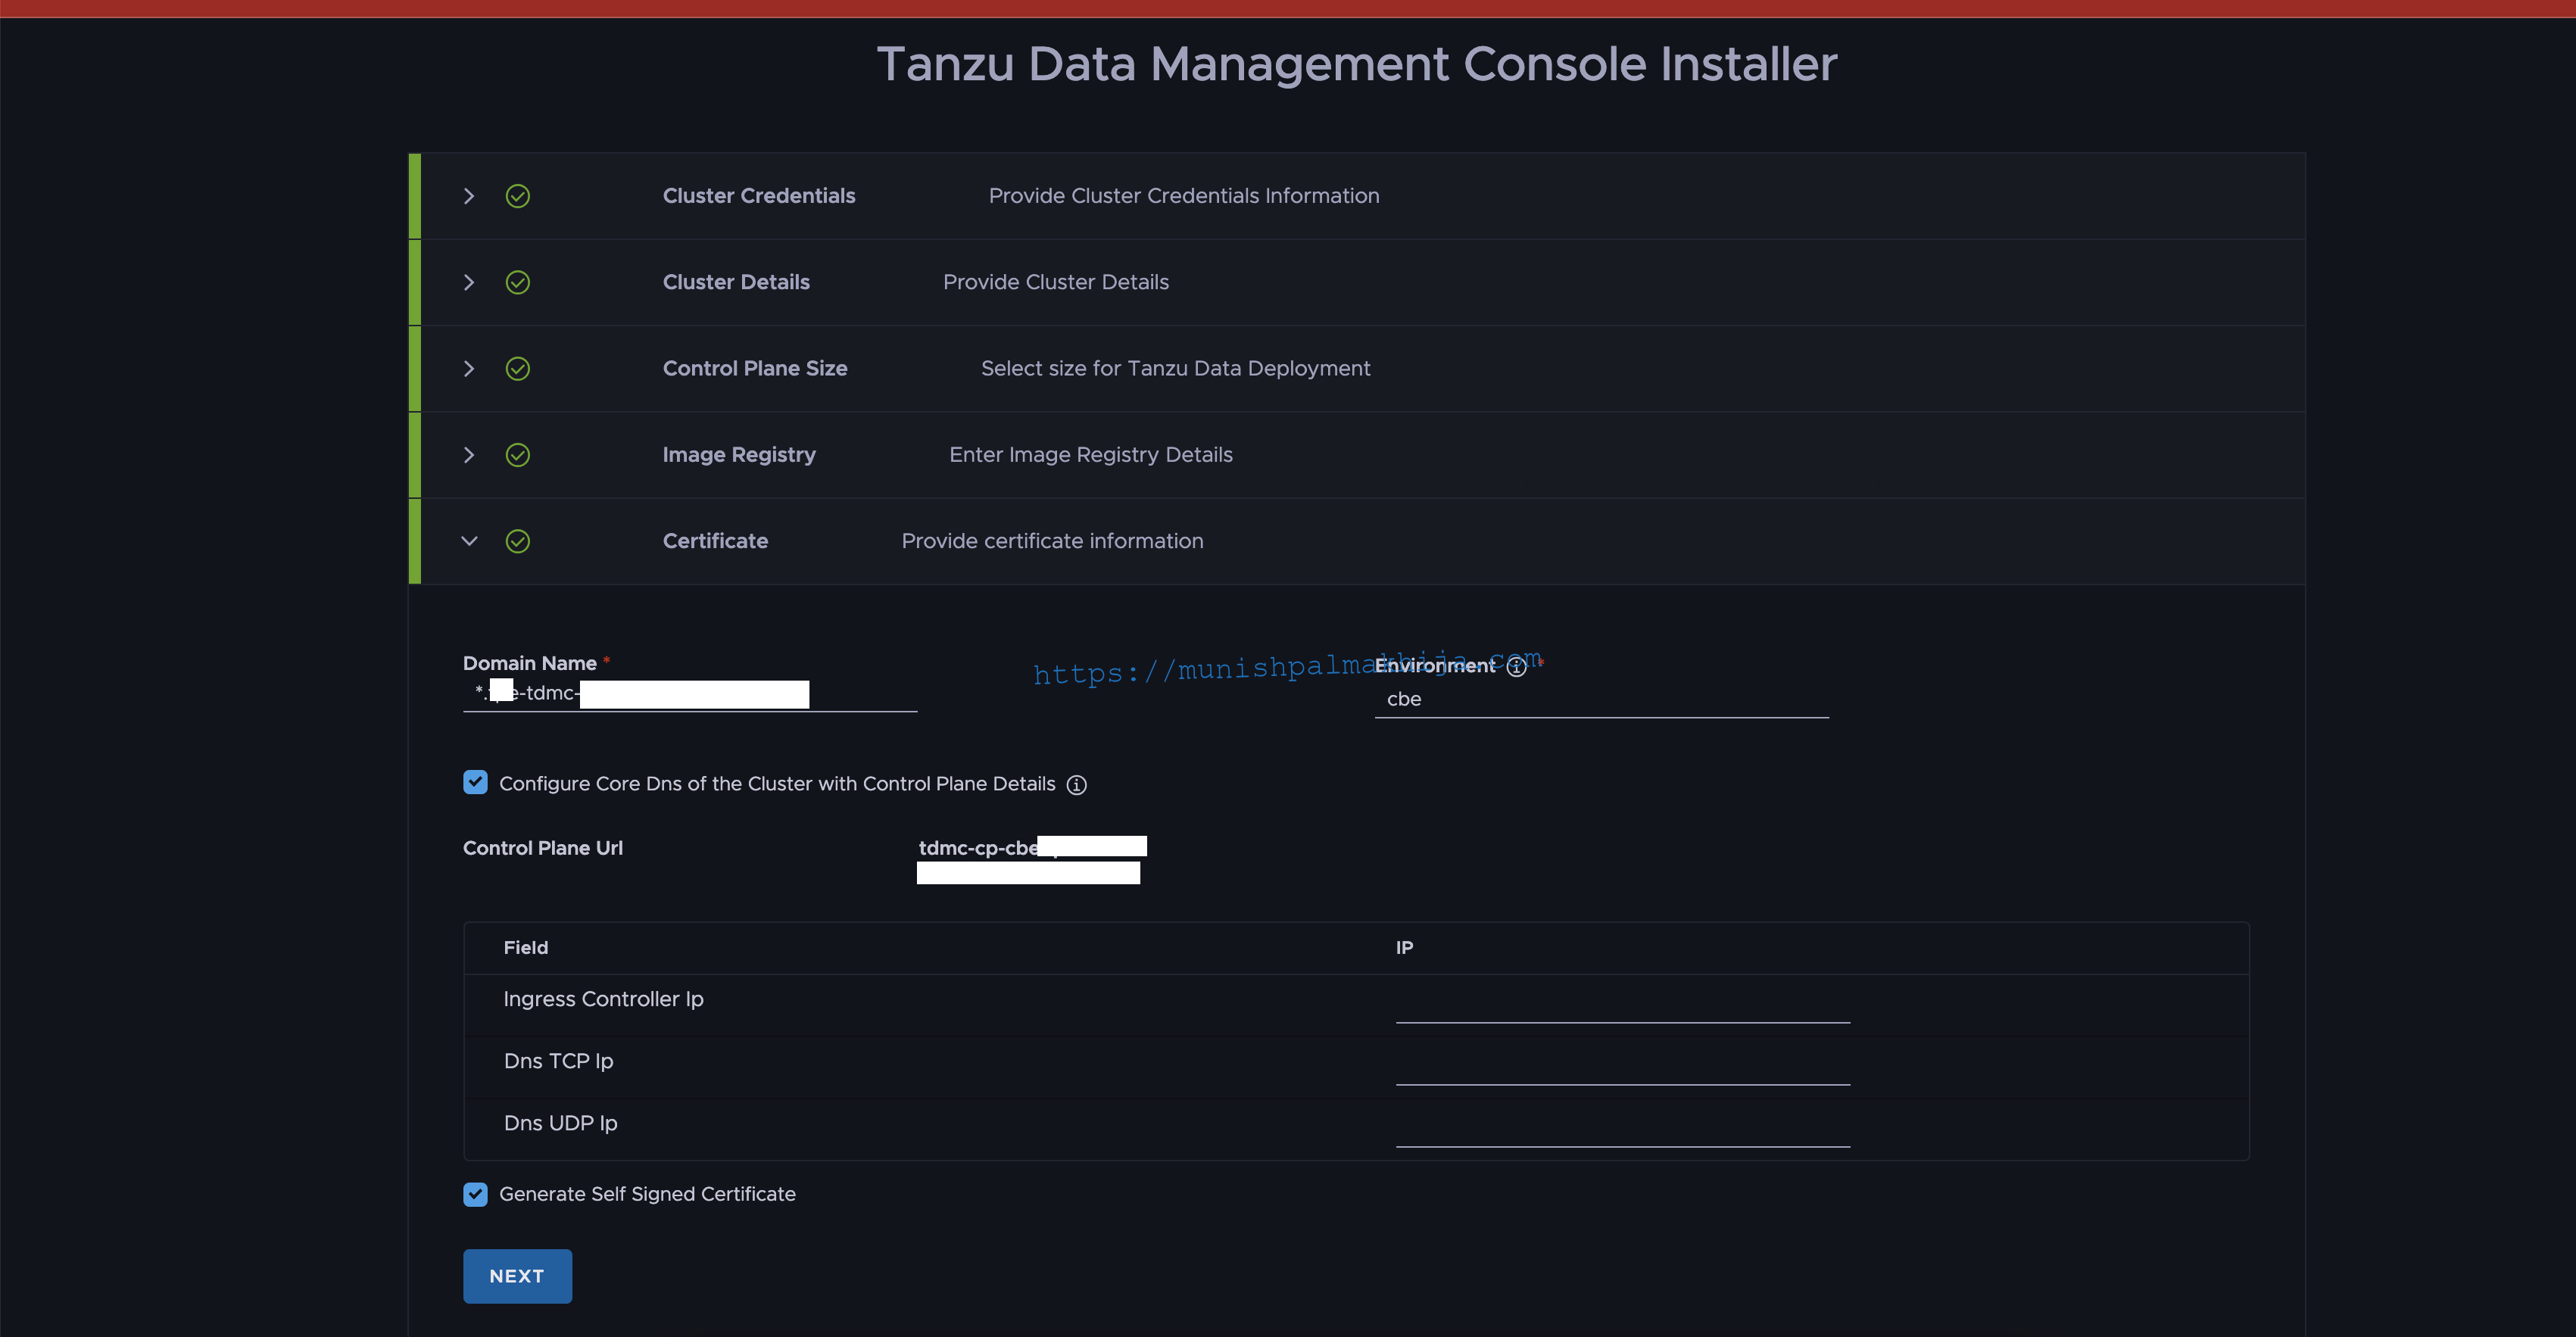
Specify Domain & Certificate details
Please keep the following things in mind
- Configure DNS delegation in your corporate DNS server for this domain
- If you are going to use your own certificate then you will need to ensure it includes the domain name specified here.
- For POC purposes select Generate Self-Signed Certificate
- Please note the generated Control Plane URL. You will need this to log in to the UI
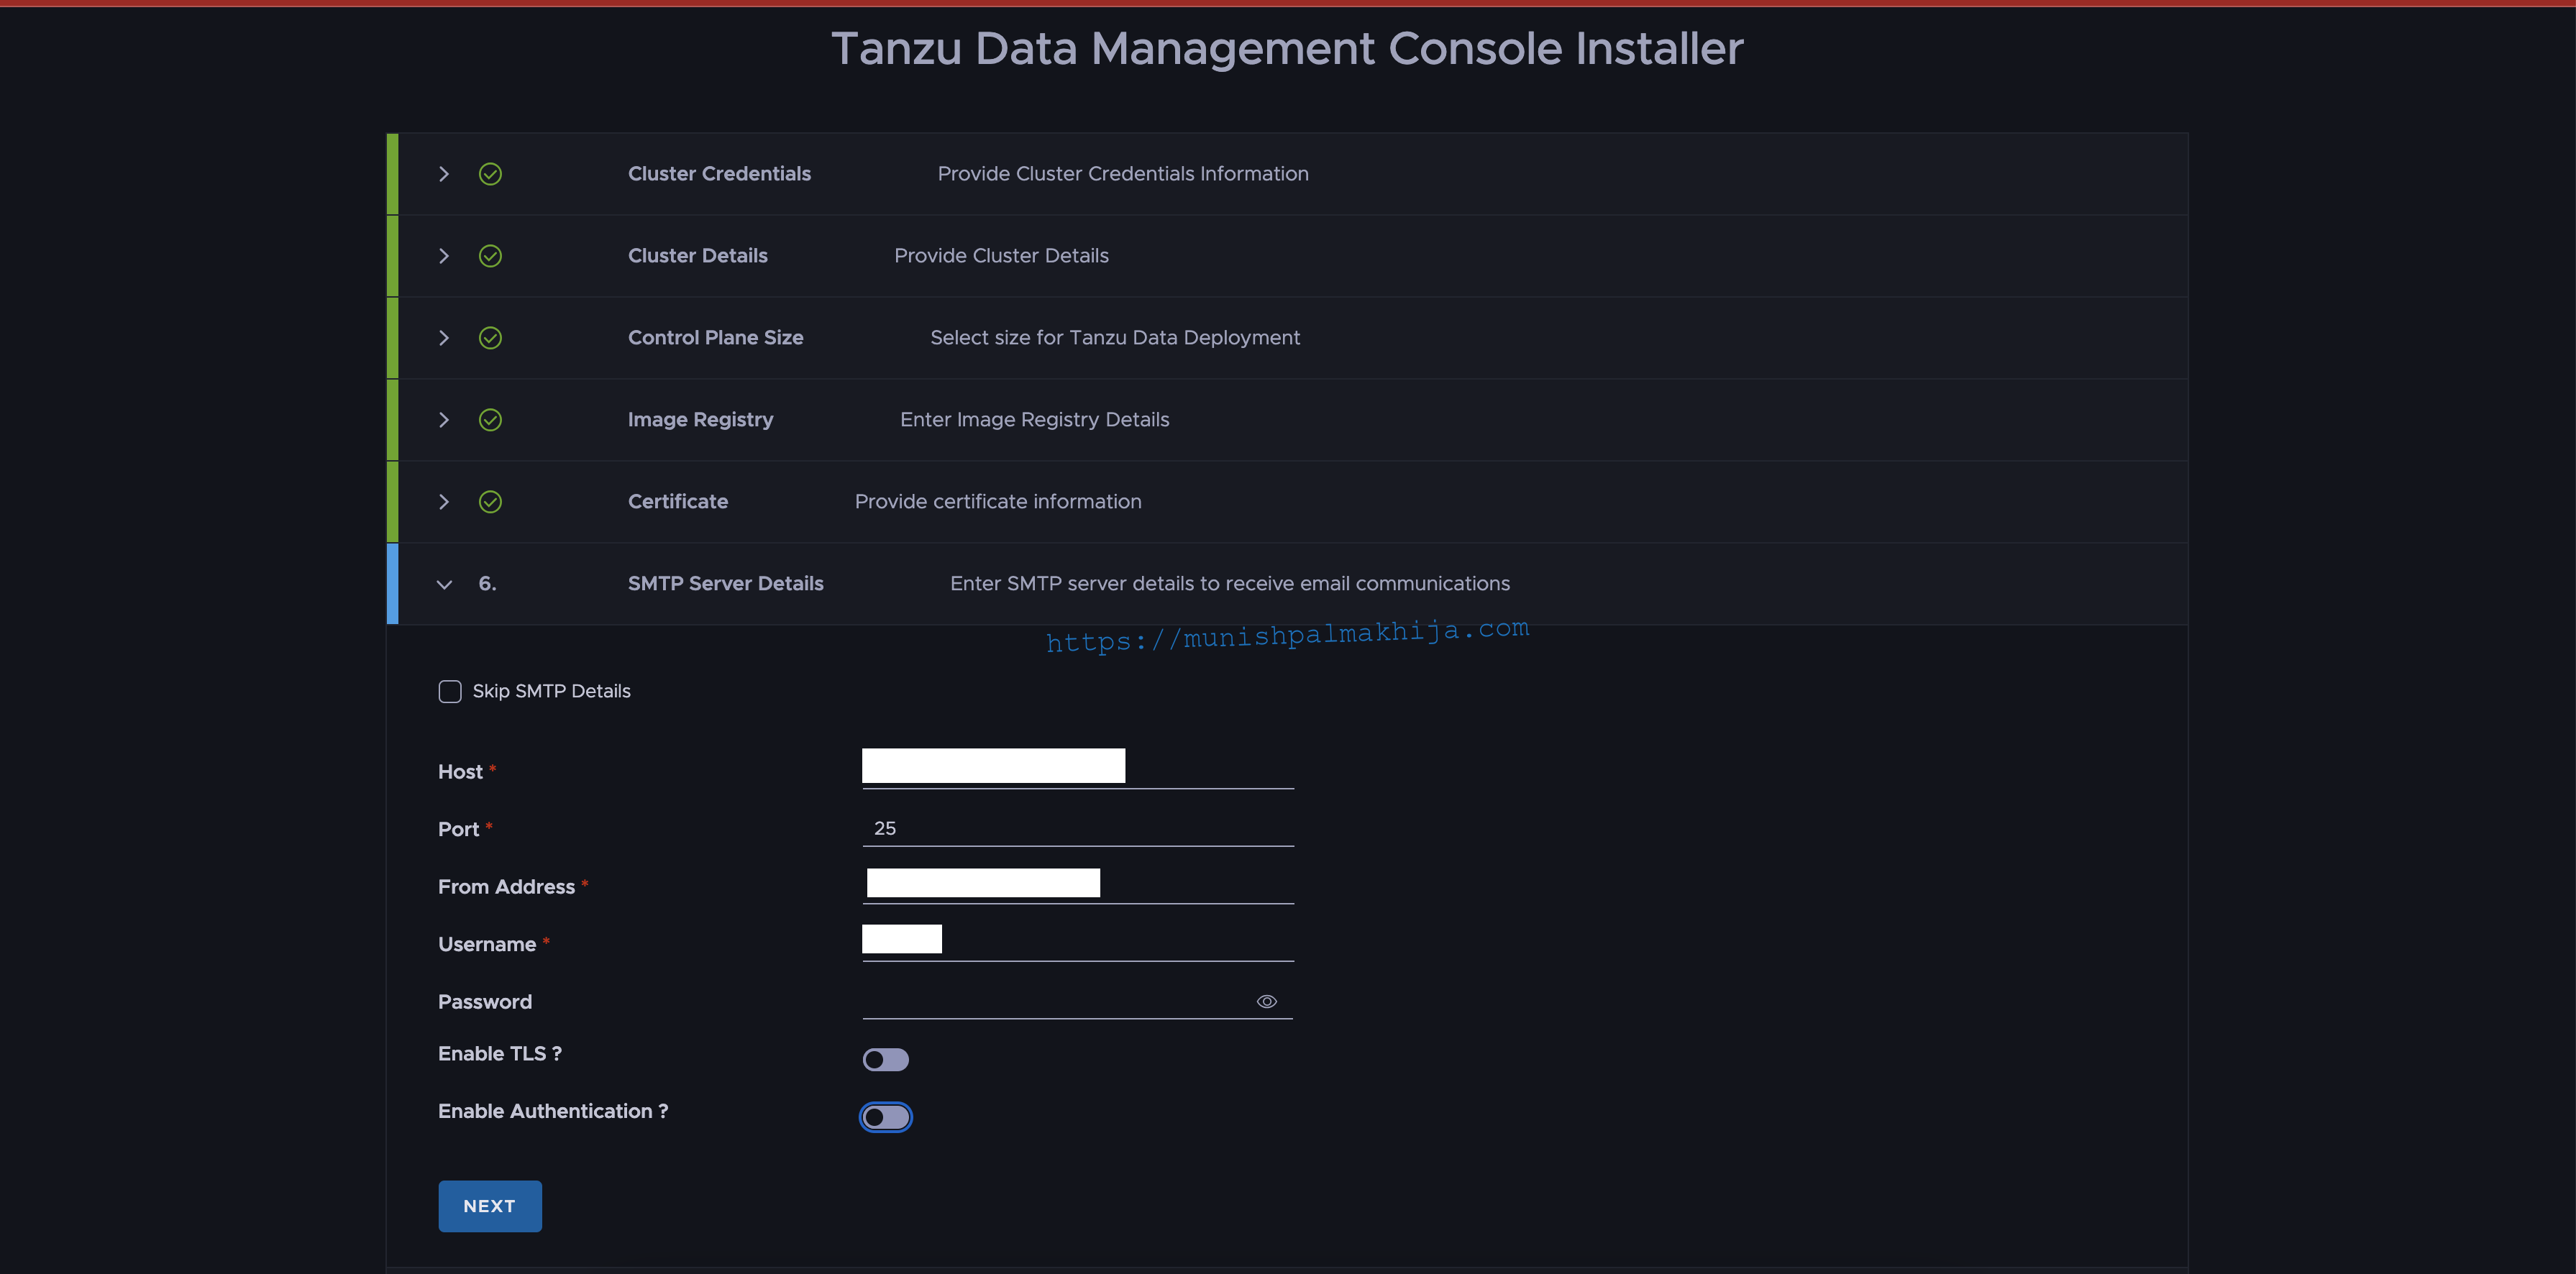
Specify SMTP Details
This is required for sending email notifications
Specify SRE Login Credentials
This is the initial login which you will use to login to the TDMC Console

Review the details
In case you want to redeploy the environment you can download the configuration in YAML.
It should take 30-40 mins approx however it can depend on the respective environment.

You should see the following message

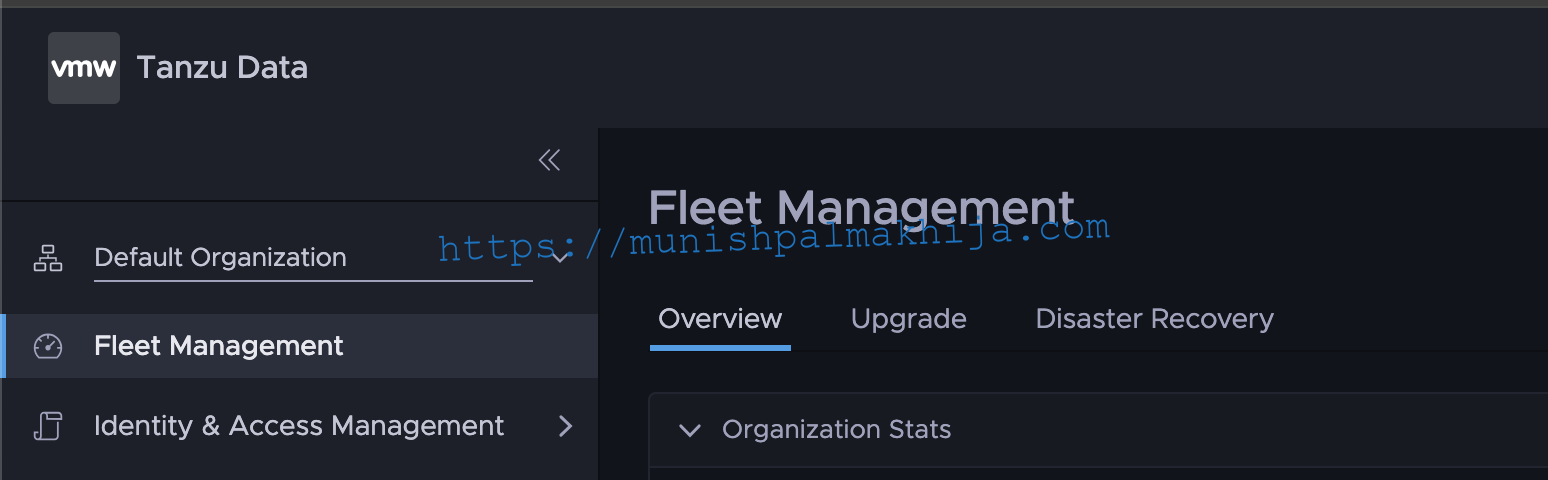
Access the UI
Once the installation is completed you can navigate to the Control Plane URL
https://tdmc-cp-<env>.<domain>
In my case it is https://tpe-cp-stg.mmlab.com
Click on Sign-In on the top right and enter the SRE Login Credentials specified above
Munish,
As usual, nicely articulated blog.
thank you for creating it.
thanks,
Ramesh
Thank you Ramesh !